Preface
Goal: Converting iconic FontAwesome glyph, for use with statusbar
Table of Content
-
Preface: Table of Content
-
Note: Read This First
-
1: Preparation
Note: Read This First
The next article is statusbar. It is going to be full of Lua coding and Lua refactoring. One part of statusbar is glyph icons. Icon topic does not have anything to do with Lua. Icon topic is a theme thing, more or less.
Compared with other image resources in previous article, statusbar icon use different approach. Instead of making original image, we can use image from Font. Most ricing use stlarch or siji. If you are lucky enough you can grab someone’s dotfiles, and copy paste the icon you need. But most of the case, chance happened that, you lost one or two specific icons that you need.
Automation in Converting
FontAwesome for use with AwesomeWM
Why don’t we take other approach. By finding the source image first, and then convert later. There are two steps in converting.
-
The first step is the source font image, You have various options, such as FontAwesome or other iconic font.
-
The second step is converting from font, such as SVG to PNG. We can do it by using inkscape.
-
The third step is converting to the right size of PNG, by imagemagick.
-
Finally, put it in theme configuration.
The interesting part is, all can be automated.
Compared with other statsubar
Some statusbar use icons, while other use font approach. For example i3statusbar support multifont, so that we can use FontAwesome easily.
However some statusbar doesn’t have multifont support, and also some ricer prefer icon image for their own preferenced. I think that, we can use any approach that suitable for each case.
Perhaps, you may use this icon glyph approach, not only for AwesomeWM Statusbar, but for other statusbar as well.
1: Preparation
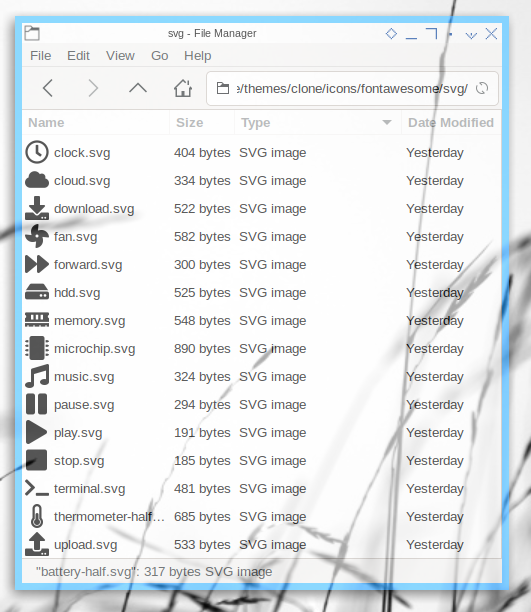
Suppose that you use FontAwesome, you can prepare the directory first.
% cd ~/.config/awesome/themes/clone/icons/fontawesome/Make these three directories.
% tree -d
.
├── png20
├── png40
└── svg
Each of these directory contain:
-
svg: The SVG source
-
png20: The SVG convert to PNG result for (20px, 20px)
-
png40: The convert to the right size (40px, 40px)
You can use diferent size. This is just an example.
2: Getting the Font Source
Assuming that you use FontAwesome, you can clone first somewhere outside your config directory.
% cd ~
% git clone https://github.com/FortAwesome/Font-Awesome
And then copy-paste all the icon that you need, into one place, to the svg directory.
3: Converting Format
The next step is to convert to PNG.
Command Line Interface/ Terminal Shell
This is very easy with command line using inkscape. For example, using (20px, 20px) size.
% inkscape -z -e png20/angle-down.png -w 20 -h 20 svg/angle-down.svgAutomation
We can automate this, batch process many images, at once.
Consider name this script svg2png.sh.
#!/usr/bin/env bash

esc=""
boldon="${esc}[1m";
boldoff="${esc}[22m"
redf="${esc}[31m";
bluef="${esc}[34m";
reset="${esc}[0m"

i=0
while read line
do
  line=${line##*/}
  array[ $i ]=${line%.svg}
  (( i++ ))
done < <(ls svg/*.svg)

for i in ${array[@]};
do
  echo "${boldon}${redf}inkscape${boldoff} ${bluef}-z -e png20/$i.png -w 20 -h 20 svg/$i.svg${reset}"
  inkscape -z -e png20/$i.png -w 20 -h 20 svg/$i.svg
done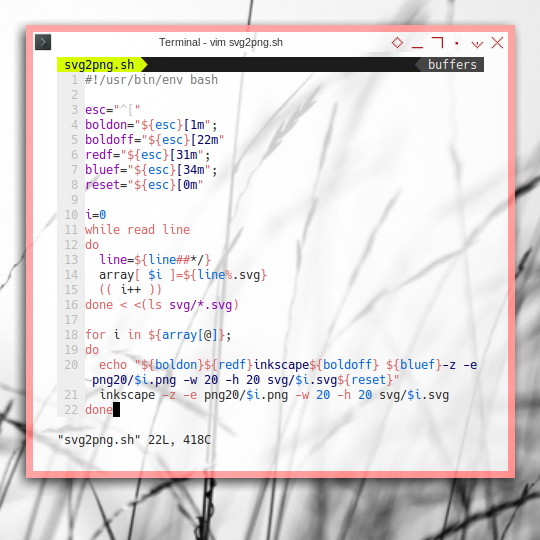
Now have a look at the result. We are going to discuss statusbar later, this is just an example.
![]()
These icons looks ugly because they are stretched to full height of statusbar. We need margin to fix this, this lead to the next step.
4: Converting Size
We can set margin with GIMP, icon glyph by icon glyph, but this is tedious task.
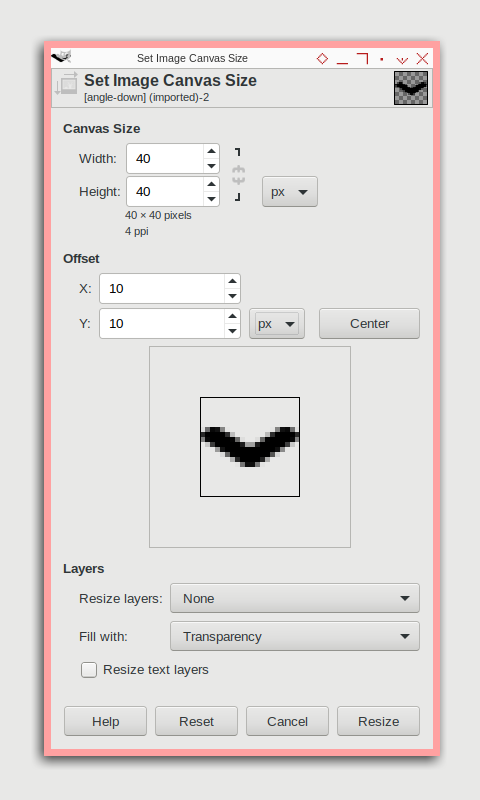
Is there any easier solution ? How about combining parts, from two images ?
Command Line Interface/ Terminal Shell
My approach of making margin is, by combining two images. One transparent image using (40px, 40px) size at the bottom, and icon using (20px, 20px) size, centering on top of the transparent image. Luckily, this task is also pretty easy with command line.
% convert transparent-40x40.png png20/angle-down.png -gravity center -compose over -composite png40/angle-down.pngThe SVG source of transparent is available at the repository, although you can do it yourself with inkscape.
Automation
We can automate this, batch process many images, at once.
Consider name this script png2center.sh.
#!/usr/bin/env bash

esc=""
boldon="${esc}[1m";
boldoff="${esc}[22m"
redf="${esc}[31m";
bluef="${esc}[34m";
reset="${esc}[0m"

i=0
while read line
do
  line=${line##*/}
  array[ $i ]=${line%.png}
  (( i++ ))
done < <(ls png20/*.png)

for i in ${array[@]};
do
  echo "${boldon}${redf}convert${boldoff} ${bluef}transparent-40x40.png png20/$i.png -gravity center -compose over -composite png40/$i.png${reset}"
  convert transparent-40x40.png png20/$i.png -gravity center -compose over -composite png40/$i.png
done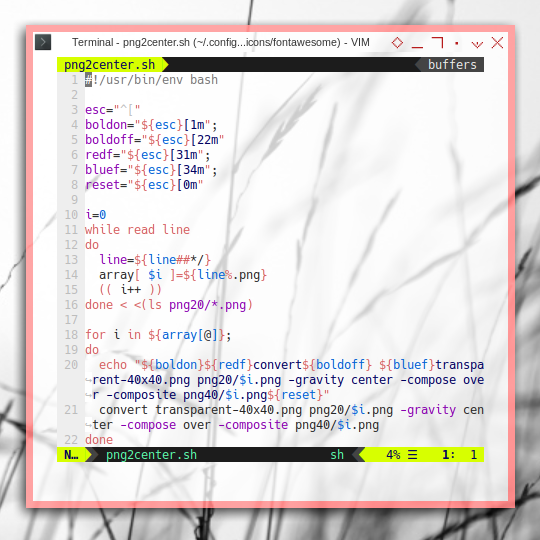
Again, have a look at the result. It is prettier with margin.
![]()
Source
All source available at:
5: Configuration
We need to map from generated PNG to Awesome predefined variable names, for later to be used in statusbar.
local icondir = ""

-- Fort Awesome

icondir = theme_path .. "icons/fontawesome/png40/"

theme.widget_example      = icondir .. "cat.png"
theme.widget_wifi         = icondir .. "wifi.png"
theme.widget_temp         = icondir .. "thermometer-half.png"
theme.widget_uptime       = icondir .. "charging-station.png"
theme.widget_cpu          = icondir .. "microchip.png"
theme.widget_fs           = icondir .. "hdd.png"
theme.widget_mem          = icondir .. "memory.png"
theme.widget_note         = icondir .. "music.png"
theme.widget_batt         = icondir .. "battery-full.png"
theme.widget_clock        = icondir .. "clock.png"
theme.widget_vol          = icondir .. "volume-up.png"
theme.widget_weather      = icondir .. "cloud.png"
theme.widget_netdown      = icondir .. "download.png"
theme.widget_netup        = icondir .. "upload.png"

theme.monitor_disk        = icondir .. "hdd.png"
theme.monitor_vol         = icondir .. "volume-up.png"
theme.monitor_vol_low     = icondir .. "volume-down.png"
theme.monitor_vol_no      = icondir .. "volume-off.png"
theme.monitor_vol_mute    = icondir .. "volume-mute..png"

theme.monitor_ac          = icondir .. "charging-station.png"
theme.monitor_bat         = icondir .. "battery-three-quarters.png"
theme.monitor_bat_low     = icondir .. "battery-quarters.png"
theme.monitor_bat_no      = icondir .. "battery-empty.png"
In statusbar, we call the variable
by using beautiful instead of theme,
for example.
-- Textclock
I.clock = wibox.widget.imagebox(beautiful.widget_clock)
That’s it. This is all for now.
What is Next?
Consider continue reading [ Awesome WM - Statusbar - Refactoring Default ]. We are going to refactor the default statusbar, before continue to a more complex statusbar, such as using vicious library or lain library.
What do you think?