Preface
Goal: Monitoring widget in statusbar using Vicious Library.
Using Vicious Library, we can manage monitoring widget, in statusbar.
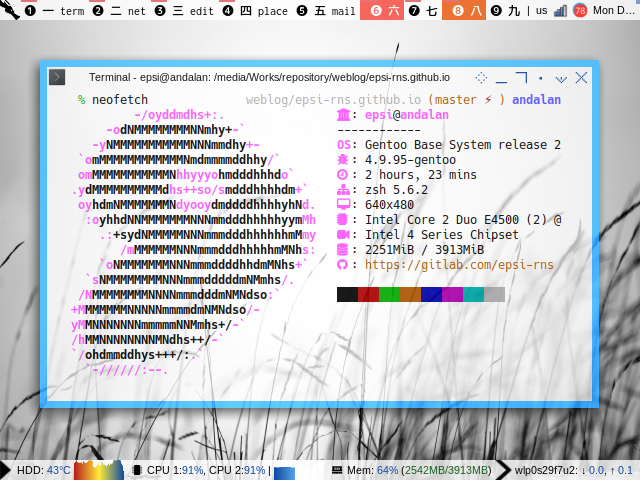
Table of Content
-
Preface: Table of Content
-
1: Prerequisite
1: Prerequisite
rc.lua
Put the statusbar code at the end of the rc.lua,
and comment other statusbar.
-- Statusbar: Wibar
--local statusbar = require("statusbar.default.statusbar")
--local statusbar = require("statusbar.stacked.statusbar")
local statusbar = require("statusbar.vicious.statusbar")
Prerequisite: The Vicious Library
If your distribution does not support lain library,
you can clone Vicious in AwesomeWM configuration directory.
$ git clone https://github.com/vicious-widgets/viciousNow you can include the vicious as any other library.
local awful     = require("awful")
local beautiful = require("beautiful")

-- Wibox handling library
local wibox = require("wibox")

-- Custom Local Library
local vw = require("statusbar.vicious.vicious")
Artefacts
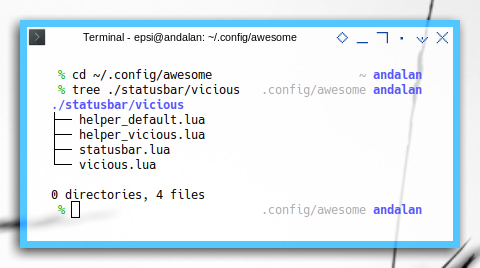
We need additional vicious.lua.
$ tree ./statusbar/vicious
./statusbar/vicious
├── helper_default.lua
├── helper_vicious.lua
├── statusbar.lua
└── vicious.lua
So now we need at least four lua files.
Arrow Decoration
This part can be skipped, but I put it here anyway, just in case anyone looking for it
function WB.initdeco ()
    -- Spacer
    WB.spacer = wibox.widget.textbox(" ")
    WB.spacerline = wibox.widget.textbox(" | ")

    -- Separators png
    WB.ar_lr_pre   = wibox.widget.imagebox()
    WB.ar_lr_pre:set_image(beautiful.arrow_lr_pre)
    WB.ar_lr_post  = wibox.widget.imagebox()
    WB.ar_lr_post:set_image(beautiful.arrow_lr_post)
    WB.ar_lr_thick = wibox.widget.imagebox()
    WB.ar_lr_thick:set_image(beautiful.arrow_lr_thick)
    WB.ar_lr_thin  = wibox.widget.imagebox()
    WB.ar_lr_thin:set_image(beautiful.arrow_lr_thin)

    WB.ar_rl_pre   = wibox.widget.imagebox()
    WB.ar_rl_pre:set_image(beautiful.arrow_rl_pre)
    WB.ar_rl_post  = wibox.widget.imagebox()
    WB.ar_rl_post:set_image(beautiful.arrow_rl_post)
    WB.ar_rl_thick = wibox.widget.imagebox()
    WB.ar_rl_thick:set_image(beautiful.arrow_rl_thick)
    WB.ar_rl_thin  = wibox.widget.imagebox()
    WB.ar_rl_thin:set_image(beautiful.arrow_rl_thin)
end
Code Preview
For you impatient folks out there, here I represent, all modules that we are going to use.
Do not get intimidated with codes above. These can be explained step by step.
2: Simple Example: Memory
The best manual for vicious is the README.md, that you can read in its respective github. For example this Memory:
memwidget = wibox.widget.textbox()
vicious.cache(vicious.widgets.mem)
vicious.register(memwidget, vicious.widgets.mem, "$1 ($2MiB/$3MiB)", 13)
However the detail implementation might different from, one dotfiles to another ricer.
vicious.lua
Step by step, the vicious.lua.
-- Required libraries
local awful     = require("awful")
local beautiful = require("beautiful")
local wibox     = require("wibox")
local vicious   = require("vicious")
local gmc       = require("themes.gmc")
Since I have to separate files, I have these objects:
local W = {}
local F = {} -- Format
local wlandev = RC.vars.wlandev

local I = {}
icon_set = I             -- object name

local T = {}
text_label = T             -- object name
Formatting
Formatting code is cumbersome, so I made these two shortucts.
local function hlspan(text)
  return "<span color='" .. gmc.color['blue900'] .. "'>" .. text .. "</span>"
end

local function altspan(text)
  return "<span color='" .. gmc.color['green900'] .. "'>" .. text .. "</span>"
end
Registering Memory
Now my code is slightly different
W.mem = wibox.widget.textbox()
F.mem = "Mem: ".. hlspan("$1%") .." (".. altspan("$2MB/$3MB") ..")"
vicious.cache(vicious.widgets.mem)
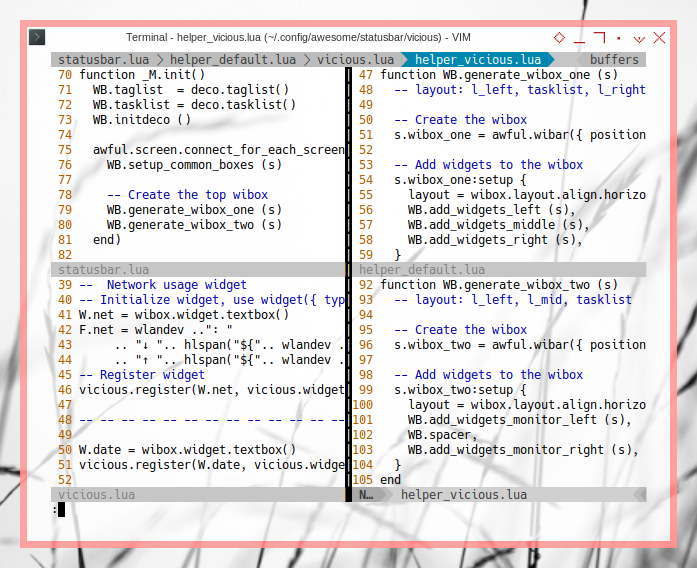
vicious.register(W.mem, vicious.widgets.mem, F.mem, 13)Helper
As usual we put WB object
-- Custom Local Library
local vw = require("statusbar.vicious.vicious")

-- -- --

local WB = wibox_package
function WB.add_widgets_monitor_left (line, s)
return {
layout = wibox.layout.fixed.horizontal,
vw.mem,
}
end
Icon
If you wish, you can add eye candy icon, just like shown in the figure above.
I.mem = wibox.widget.imagebox(beautiful.widget_mem)From icons.lua in theme directory.
theme.widget_mem = icondir .. "memory.png"And finally the helper
local WB = wibox_packagefunction WB.add_widgets_monitor_left (line, s)
local ic = icon_set
return {
layout = wibox.layout.fixed.horizontal,
ic.mem, vw.mem,
}
end3: More Standard Example
With those arrangement above we can setup more widget.
Step by step, the vicious.lua.
Network
--  Network usage widget
-- Initialize widget, use widget({ type = "textbox" }) for awesome < 3.5
W.net = wibox.widget.textbox()
F.net = wlandev ..": "
     .. "↓ ".. hlspan("${".. wlandev .." down_kb}") .. ", "
     .. "↑ ".. hlspan("${".. wlandev .." up_kb}")
-- Register widget
vicious.register(W.net, vicious.widgets.net, F.net, 3)
Date
W.date = wibox.widget.textbox()
vicious.register(W.date, vicious.widgets.date, "%b %d, %R")
Battery
W.battery = wibox.widget.textbox()
F.battery = "Bat: ".. hlspan("$1$2")
vicious.register(W.battery, vicious.widgets.bat, F.battery, 67, "BAT0")
Memory
I.mem = wibox.widget.imagebox(beautiful.widget_mem)
W.mem = wibox.widget.textbox()
F.mem = "Mem: ".. hlspan("$1%") .." (".. altspan("$2MB/$3MB") ..")"
vicious.cache(vicious.widgets.mem)
vicious.register(W.mem, vicious.widgets.mem, F.mem, 13)
CPU
I.cpu = wibox.widget.imagebox()
I.cpu:set_image(beautiful.widget_cpu)

W.cpu = wibox.widget.textbox()
F.cpu = "CPU 1:".. hlspan("$1%") ..", "
     .. "CPU 2:".. hlspan("$2%")
vicious.cache(vicious.widgets.cpu)
vicious.register(W.cpu, vicious.widgets.cpu, F.cpu, 17)
HDD Temperature
W.hddtemp = wibox.widget.textbox()
F.hddtemp = " HDD: ".. hlspan("${/dev/sda}°С")
vicious.register(W.hddtemp, vicious.widgets.hddtemp, F.hddtemp, 41, "7634")
Music Player Daemon
W.mpd = wibox.widget.textbox()
wmpd = W.mpd
F.mpd = function (wmpd, args)
    if args["{state}"] == "Stop" then
        return " - "
    else
       return hlspan(args["{Artist}"])..' - '.. altspan(args["{Title}"])
    end
  end

vicious.register(W.mpd, vicious.widgets.mpd, F.mpd, 10)
Example One
Consider show the wdiget above in this example below:
function WB.add_widgets_monitor_left (line, s)
  local ic = icon_set

  return {
    layout = wibox.layout.fixed.horizontal,
    WB.ar_lr_post,
    WB.spacer,
    vw.hddtemp,
    WB.spacer,
    ic.cpu, vw.cpu,
    WB.spacerline,
    ic.mem, vw.mem,
  }
end
Example Two
Or this example below:
function WB.add_widgets_monitor_left (line, s)
  local ic = icon_set

  return {
    layout = wibox.layout.fixed.horizontal,
    WB.ar_lr_post,
    WB.spacer,
    vw.date,
    WB.spacerline,
    vw.battery,
    WB.spacerline,
    vw.net,
    WB.spacerline,
    vw.mpd,
  }
end
4: Standard Graphical Widget
This is a little bit harder, since we should dive into Awesome documentation.
Official Vicious Documentation
Consider refer to official document first in README.md.
cpuwidget = awful.widget.graph()
cpuwidget:set_width(50)
cpuwidget:set_background_color"#494B4F"
cpuwidget:set_color{type = "linear", from = {0, 0}, to = {50, 0},
                    stops = { {0, "#FF5656"}, {0.5, "#88A175"}, {1, "#AECF96"}} }
vicious.register(cpuwidget, vicious.widgets.cpu, "$1", 3)
Custom Vicious
My customization is basically just a copy paste of above example.
W.graph_cpu = awful.widget.graph()
W.graph_cpu:set_width(50)
W.graph_cpu:set_background_color(gmc.color['white'] .. "cc")
W.graph_cpu:set_color({
    type = "linear",
    from = { 0, 0 },
    to = { 50, 0 },
    stops = {
      { 0,   gmc.color['red900'] },
      { 0.5, gmc.color['yellow500'] },
      { 1,   gmc.color['blue900'] }}
})
vicious.cache(vicious.widgets.cpu)
vicious.register(W.graph_cpu, vicious.widgets.cpu, "$1", 7)
It is pretty explanatory how the color change, from red to yellow in the middle and stop to blue at the right most.
And so is the memory, we can use smoother color.
W.graph_mem = awful.widget.graph()
W.graph_mem:set_width(50)
W.graph_mem:set_background_color(gmc.color['white'] .. "cc")
W.graph_mem:set_color({
    type = "linear",
    from = { 0, 0 },
    to = { 50, 0 },
    stops = {
      { 0,   gmc.color['blue900'] },
      { 0.5, gmc.color['blue300'] },
      { 1,   gmc.color['blue500'] }}
})
vicious.cache(vicious.widgets.mem)
vicious.register(W.graph_mem, vicious.widgets.mem, "$1", 17)
If you do not like the color, just remember that this is just an example. I know I suck at aestethic aspect sometimes.
Helper
Now here is the graph_cpu and graph_mem,
along with other widget
function WB.add_widgets_monitor_left (line, s)
  local ic = icon_set

  return {
    layout = wibox.layout.fixed.horizontal,
    WB.ar_lr_post,
    WB.spacer,
    vw.hddtemp,
    WB.spacer,
    vw.graph_cpu,
    WB.spacer,
    ic.cpu, vw.cpu,
    WB.spacerline,
    vw.graph_mem,
    WB.spacer,
    ic.mem, vw.mem,
    WB.spacer,
    WB.ar_lr_thin,
    WB.spacer,
    vw.battery,
    WB.spacerline,
    vw.net
  }
end
5: More Graphical Widget
Luckily Awesome is so rich with Widget customization possibility.
I must admit I still don not understand most of them.
One of the is progressbar.
Custom Vicious
However this is an example that I can share so far:
T.mem = wibox.widget.textbox("Mem: ")

W.progress_mem = wibox.widget.progressbar()

-- Create wibox
membox = wibox.layout.margin(
  wibox.widget {
    {
      max_value = 1,
      widget = W.progress_mem,
      width         = 100,
      paddings      = 3,
      border_width  = 1,
      border_color     = gmc.color['blue900'],
      background_color = gmc.color['white'],
      color = {
        type  = "linear",
        from  = {0, 0},
        to    = {50, 0},
        stops = {
          { 0,   gmc.color['blue900'] },
          { 0.5, gmc.color['blue300'] },
          { 1,   gmc.color['blue500'] }
        }
      }
    },
    layout = wibox.layout.stack
  },
  1, 1, 3, 3)

-- Register widget
--vicious.cache(vicious.widgets.mem)
vicious.register(W.progress_mem, vicious.widgets.mem, "$1", 11)
And the CPU:
T.cpu = wibox.widget.textbox("CPU: ")

W.progress_cpu = wibox.widget.progressbar()

-- Create wibox
cpubox = wibox.layout.margin(
  wibox.widget {
    {
      max_value = 1,
      widget = W.progress_cpu,
      width         = 100,
      paddings      = 3,
      border_width  = 1,
      border_color     = gmc.color['blue900'],
      background_color = gmc.color['white'],
      color = {
        type  = "linear",
        from  = {0, 0},
        to    = {50, 0},
        stops = {
          { 0,   gmc.color['yellow900'] },
          { 0.5, gmc.color['orange300'] },
          { 1,   gmc.color['red500'] }
        }
      }
    },
    layout = wibox.layout.stack
  },
  1, 1, 3, 3)

-- Register widget
--vicious.cache(vicious.widgets.mem)
vicious.register(W.progress_cpu, vicious.widgets.cpu, "$1", 13)
We do not need to cache, because we have already cached it in left wibox.
Helper
Now here is the progress_cpu and progress_mem,
alone without any other widget.
function WB.add_widgets_monitor_right (line, s)
  local ic = icon_set
  local tl = text_label

  return {
    layout = wibox.layout.fixed.horizontal,
    WB.spacer,
    ic.cpu, tl.cpu, vw.progress_cpu,
    WB.spacer,
    ic.mem, tl.mem, vw.progress_mem,
    WB.spacer,
    WB.spacerline,
    WB.ar_rl_pre,
  }
end
What is Next?
Now that we are done with vicious statusbar,
we can learn about more interesting library called lain.
Consider continue reading [ Awesome WM - Statusbar - Lain ].