Preface
Ricing has many component, from original wallpaper, window manager, panel, and mostly terminal based application. So why not make your own CLI app running in your beloved terminal ? And give any color as you like ? We can use conky that already equipped with system monitoring tools. And make some Lua tweak to make our conky easy to use.
Reading:
This tutorial guide you step by step from a very simple output using watch then Bash, Simple Cokly and later Conky Lua.
Table of Content
-
Preface: Table of Content
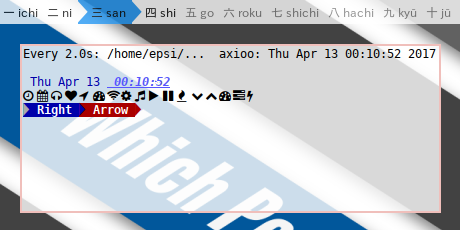
1: Using Bash and Watch
Coloring terminal require knowledge of ANSI escape codes.
This step also print some exotic character. You need both FontAwesome and PowerlineSymbol, installed properly in your system.
If you desire to keep calling the script between interval,
there is watch --color command line,
that suit this requirement.
$ watch --color ~/Documents/standalone/cli/example/01.shSource:

#!/usr/bin/env bash
esc="\033"
fgRed="${esc}[31m"
fgBlue="${esc}[34m"
fgWhite="${esc}[37m"
bgRed="${esc}[41m"
bgBlue="${esc}[44m"
bgWhite="${esc}[47m"
complexBlue="${esc}[1;3;4;34m"
boldOn="${esc}[1m"
boldOff="${esc}[22m"
reset="${esc}[0m"
date=$(date +'%a %b %d')
time=$(date +'%H:%M:%S')
arrow="${boldOff}"
awesome=' '
text=""
text+="${fgBlue} ${date} "
text+="${complexBlue} ${time}"
text+="${reset}\n"
text+="${awesome}"
text+="${reset}\n"
text+="${bgBlue}${fgWhite}${arrow}"
text+="${bgBlue}${fgWhite}${boldOn} Right "
text+="${bgRed}${fgBlue}${arrow}"
text+="${bgRed}${fgWhite}${boldOn} Arrow "
text+="${reset}${fgRed}${arrow}"
text+="\n"
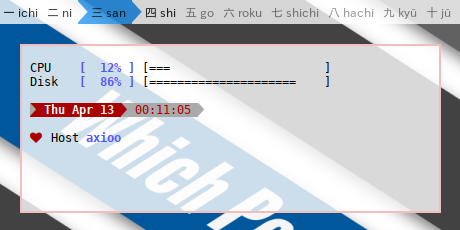
echo -e $text2: Using Bash Loop Only
We can use bash loop only, instead of using watch.
$ ~/Documents/standalone/cli/example/02.shTwo things should be noted is this two commands.
clear clear the terminal,
and tput move cursor to top left
everytime the loop begin.
$ clear$ tput cup 0 0I also put a more complete ANSI escaping code in separate bash script.
Source:

#!/usr/bin/env bash
DIR=$(dirname "$0")
. ${DIR}/ansi.sh
. ${DIR}/helpercpu.sh
. ${DIR}/progressbar.sh
initializeANSI
arrow="${boldOff}"
# hide cursor
tput civis -- invisible
# type' tput cnorm' to show
clear
while :; do
helperCPU
tput cup 0 0
echo ""
# cpu
value=$cpu_util
progressbar $value
percent=$(printf "[ %3d%% ]" $value)
diskText="${reset}"
diskText+=" CPU ${fgBlue}${boldOn}$percent${reset} "
diskText+=$progressBarText
echo -e "$diskText"
# disk
value=$(df /home -h | awk 'FNR == 2 {print $5}' | sed s/%//)
progressbar $value
percent=$(printf "[ %3d%% ]" $value)
diskText="${reset}"
diskText+=" Disk ${fgBlue}${boldOn}$percent${reset} "
diskText+=$progressBarText
echo -e "$diskText"
# date time
date=$(date +'%a %b %d')
time=$(date +'%H:%M:%S')
dateText="\n${reset} "
dateText+="${bgRed}${fgWhite}${arrow}"
dateText+="${bgRed}${fgWhite}${boldOn} ${date} "
dateText+="${bgWhite}${fgRed}${arrow}"
dateText+="${bgWhite}${fgRed} ${time} "
dateText+="${reset}${fgWhite}${arrow}"
dateText+="${reset}\n"
echo -e "$dateText"
# host
value=$(uname -n)
echo -e " ${fgRed} ${reset}Host ${fgBlue}${boldOn}$value\n"
sleep 2
doneSince it looks complicated, we have to move the complex part somewhere else.
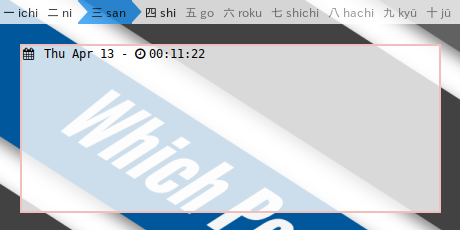
3: A Very Simple Conky
This part move the output part from Bash to Conky Lua. In Conky, printing Date and Time this should be as easy as this line.
conky.text = [[\
${time %a %b %d} - ${time %H:%M:%S}\
]]
The bash part only contain the clear.
Conky has capability to initialize stuff,
and run once before rendering text.
The issue is, it use Conky environment,
and it does not use terminal environment.
So we still need Bash to clear the terminal.
$ ~/Documents/standalone/cli/example/03.shSource:

#!/usr/bin/env bash

# hide cursor
# type' tput cnorm' to show
tput civis  -- invisible

clear

DIR=$(dirname "$0")
conky -c ${DIR}/03.lua
-- vim: ts=4 sw=4 noet ai cindent syntax=lua
--[[
Conky, a system monitor, based on torsmo
]]
conky.config = {
out_to_x = false,
out_to_console = true,
short_units = true,
update_interval = 1
}
-- Lua Function Demo
-- https://github.com/brndnmtthws/conky/issues/62
function exec(command)
local file = assert(io.popen(command, 'r'))
local s = file:read('*all')
file:close()
s = string.gsub(s, '^%s+', '')
s = string.gsub(s, '%s+$', '')
s = string.gsub(s, '[\n\r]+', ' ')
return s
end
function gototopleft()
return exec('tput cup 0 0')
end
conky.text = gototopleft() .. [[\
${time %a %b %d} - ${time %H:%M:%S}\
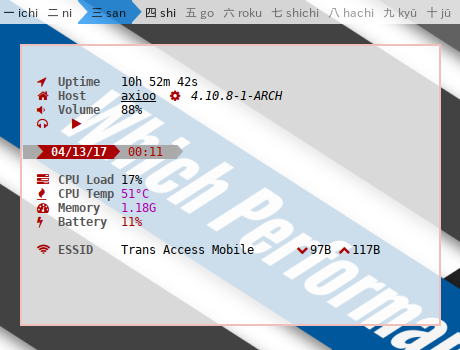
]]4: Using Conky Lua
I do not prefer complexity, so I put the detail of system monitoring part in submodule libraries.
Now you can see in code below. That’s tidy.
$ ~/Documents/standalone/cli/conky/main.shSource:

-- vim: ts=4 sw=4 noet ai cindent syntax=lua

--[[
Conky, a system monitor, based on torsmo
]]

conky.config = {
    out_to_x = false,
    out_to_console = true,
    short_units = true,
    update_interval = 1
}

-- load subroutine
local dirname  = debug.getinfo(1).source:match("@?(.*/)")

dofile(dirname .. 'ansi.lua')
dofile(dirname .. 'helper.lua')
dofile(dirname .. 'parts.lua')

-- shortcut
local _h = helper

--[[
-- if you care about performance, comment-out this variable.
disabled = ''
    .. parts.title
    .. parts.newline
    .. parts.newline
    .. parts.date
    .. parts.time
    .. parts.newline
    .. parts.mem
]]

enabled = ''
    .. parts.newline
    .. parts.newline

    .. parts.uptime
    .. parts.newline
    .. parts.host
    .. parts.machine
    .. parts.newline

    .. parts.volume
    .. parts.newline
    .. parts.mpd
    .. parts.newline
    .. parts.newline

    .. parts.datetime
    .. parts.newline
    .. parts.newline

    .. parts.cpu0
    .. parts.newline
    .. parts.cputemp
    .. parts.newline
    .. parts.memory
    .. parts.newline
    .. parts.battery

    .. parts.newline
    .. parts.newline
    .. parts.ssid
    .. parts.network
    .. parts.newline
    .. parts.newline

conky.text = _h.gototopleft() .. [[\
]] .. enabled .. [[
]]
.
Conclusion
Coding is Fun. Again, this is just a quick and dirty solution. You can do better.
That is all for now. Thank you for reading.
Have Fun