Preface
Goal: A guide how to write Lemonbar in Bash.
Table of Content
-
Preface: Table of Content
References
Reading
Using XLFD
Yesterday, I wrote another article about XLFD font. I recommend you to read that article before using Lemonbar.
Article:
1: Simple Piping to Lemonbar
Our very first script, a very simple example,
example/01.sh.
This example describe parameters supported,
related to lemonbar configuration.
It is set from external lemonbar.
$ ~/Documents/standalone/lemon/example/01.shFor more information you can use the manual.
$ man lemonbarSource:
Figure below show a transparent lemonbar on top. With three different Font, in one panel.

#!/usr/bin/env bash

colWhite='ffffff'
colBlack='000000'

generated_output() {
    homeicon_awesome='\uf015'
    timeicon_siji='\ue018'

    # endless loop
    while true; do
      echo -en " $homeicon_awesome "
      echo -en " $timeicon_siji "
      date +'%a %b %d %H:%M:%S'
      sleep 1
    done
}

# settings
position="640x24+0+0"
background="#aa$colWhite"
foreground="#ff$colBlack"

# XLFD
font_fixed='-*-fixed-medium-*-*-*-12-*-*-*-*-*-*-*'
font_siji='-wuncon-siji-medium-r-normal--10-100-75-75-c-80-iso10646-1'
font_awesome='-*-fontawesome-medium-*-*-*-17-*-*-*-*-*-*-*'

generated_output | lemonbar \
    -g $position -u 2 -B $background -F $foreground \
    -f $font_fixed -f $font_awesome -f $font_siji
Here we are using XFLD font, and unicode number. This is important part, as you cannot use XFT with original Lemonbar.
homeicon_awesome='\uf015'
timeicon_siji='\ue018'

font_fixed='-*-fixed-medium-*-*-*-12-*-*-*-*-*-*-*'
font_siji='-wuncon-siji-medium-r-normal--10-100-75-75-c-80-iso10646-1'
font_awesome='-*-fontawesome-medium-*-*-*-17-*-*-*-*-*-*-*'
I also add alpha transparency. Have a look at the source.
2: Decorating Lemonbar with BASH
The next step is feature related to text formatting in lemonbar.
It is set internally by lemonbar. I separate main script
example/02-main.sh that configure
external parameter. And generated output by loop
example/02-output.sh that set
internal lemonbar formatting. I also put all colors in one place,
example/gmc.sh.
GMC stand for Google Material Color.
In this step, I’m using XFT Font. So we need lemonbar-xft-git, replacing the original lemonbar.
$ ~/Documents/standalone/lemon/example/02-main.shSource:
You can see in figure below, how alignment made in lemonbar. The home icon is on the right side of the statusbar panel. It lso has very nice underline.

#!/usr/bin/env bash

# include
. ~/Documents/standalone/lemon/example/gmc.sh
. ~/Documents/standalone/lemon/example/02-output.sh

# settings
position="640x24+0+0"
background="#aa$colWhite"
foreground="#ff$colBlack"

# XFT
# require lemonbar_xft_git
font_symbol="PowerlineSymbols-10"
font_awesome="FontAwesome-10"
font_monospace="monospace-10"


generated_output | lemonbar \
    -g $position -u 2 -B $background -F $foreground \
    -f $font_monospace -f $font_awesome -f $font_symbol
This step, require knowledge, of a few lemonbar tags.
-
Foreground Color:
%{F} -
Background Color:
%{B} -
Underline Color:
%{U} -
Alignment:
%{l},%{c}, and%{r}
#!/usr/bin/env bash
# Char glyps for powerline fonts
sep_left="" # Powerline separator left
sep_right="" # Powerline separator right
sep_l_left="" # Powerline light separator left
sep_l_right="" # Powerline light sepatator right
homeicon_awesome=''
generated_output() {
# endless loop
while :; do
local date=$(date +'%a %b %d')
local time=$(date +'%H:%M:%S')
local text=""
text+="%{r} "
text+="%{B-}%{F-}%{-u}"
text+="$homeicon_awesome "
# Lemon Feature
# Font Test using XFT
text+="%{c}"
text+="%{B-}%{F-}%{-u} "
text+="%{B#cc$colBlue500}%{U#$colGrey900}%{+u}"
text+="%{F#$colBlue800} $sep_right"
text+="%{F#$colGrey900} "
text+="%{F#$colGrey200} $date "
text+="%{B-}%{F-}%{-u}"
text+="%{B#cc$colGreen500}%{U#$colGrey200}%{+u}"
text+="%{F#$colGreen200} $sep_right"
text+="%{F#$colGrey200} "
text+="%{F#$colGrey900} $time "
text+="%{B-}%{F-}%{-u} "
echo $text
sleep 1
done
}It is just an example, we need a more clear format,
than typing text+= over and over again.
And Conky is just the right tools comes for us.
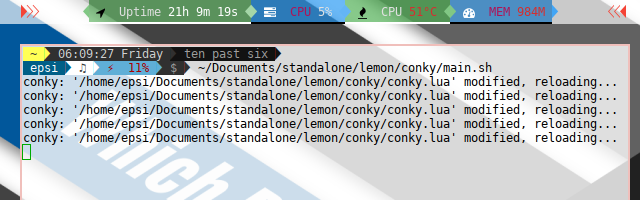
3: Composing Lemonbar in Conky Format
Just like the previous example, I have separated lemonbar parameter
example/03-main.sh and formatting.
This time in Lua. example/03-output.lua
$ ~/Documents/standalone/lemon/example/03-main.shSource:

The only different of the main bash script is the Conky loader.
generated_output() {
    conky -c ~/Documents/standalone/lemon/example/03-output.lua
}
You can debug your Conky output via command line interface.
$ conky -c ~/Documents/standalone/lemon/example/03-output.luaConky configuration itself is in fact a Lua script.
It contain two main parts.
conky.config and conky.text.
The first part, persist accros this tutorial.
But we need more attention to the second part.
conky.config = {
out_to_x = false,
out_to_console = true,
short_units = true,
update_interval = 1
}
colGrey900 = '\\#212121'
colGrey200 = '\\#eeeeee'
colAlphaBlue500 = '\\#aa2196f3'
colGreen500 = '\\#4caf50'
colRed500 = '\\#f44336'
conky.text = [[\
%{r} \
%{B-}%{F-}%{-u}\
%{F]] .. colRed500 ..[[}\
\
%{l} \
%{B-}%{F-}%{-u}\
\
%{F]] .. colRed500 ..[[}\
%{c}\
%{B-}%{F-}%{-u}\
%{F]] .. colGreen500 ..[[}\
%{B]] .. colGreen500 ..[[}%{U]] .. colGrey200 ..[[}%{+u}\
%{F]] .. colGrey200 ..[[} \
%{B]] .. colAlphaBlue500 .. [[}%{U]] .. colGrey900 ..[[}%{+u}\
%{F]] .. colGreen500 .. [[}\
%{F]] .. colGrey900 ..[[} \
%{F]] .. colGrey200 ..[[} ${time %a %b %d} \
%{F]] .. colGreen500 ..[[}\
\
%{B-}%{F-}%{-u}\
%{B]] .. colGreen500 ..[[}%{U]] .. colGrey200 ..[[}%{+u}\
%{F]] .. colGrey200 ..[[} \
%{F]] .. colGrey900 ..[[} ${time %H:%M:%S} \
%{B-}%{F-}%{-u}\
%{F]] .. colGreen500 ..[[}\
\
]]4: Lemonbar with Modularized Lua in Conky
“Let’s be tidy and get organized.”
I have made quick-and dirty-scripts. Just an example. It is never intended to be a perfect script. And you can write better than mine later.
Le’ts see the file structure. It contains:
-
Main BASH script, top pipe Conky to Dzen2:
main.sh. -
A Conky Configuration Resource, as a script entry point:
conky.lua. You can freely modify this conky. -
Two submodule libraries:
helper.luaandparts.lua. -
One asset contain Google Material Color for convenience:
gmc.lua. -
One Themable File:
assembly.lua. This assembly combine some segments, and put them together into panel. You can make your own assembly, and change the looks.
$ ~/Documents/standalone/lemon/conky/main.shSource:
The entry point conky.lua relatively is simple.
I have put all the stuff in libraries.
local dirname = debug.getinfo(1).source:match("@?(.*/)")
dofile(dirname .. 'gmc.lua')
dofile(dirname .. 'helper.lua')
dofile(dirname .. 'parts.lua')
dofile(dirname .. 'assembly.lua')
-- shortcut
local _h = helper
lf = helper.lemonForeground
lb = helper.lemonBackground
la = helper.lemonBackgroundAlpha
lu = helper.lemonUnderline
lr = helper.lemonReset
conky.text = [[\
%{r} \
]] .. lr() .. lf(colRed500) .. [[ \
%{l} \
]] .. lr() .. lf(colRed500) .. [[ \
%{c}\
]] .. lr() .. lf(colGreen300) .. [[\
]] .. enabled
.. lr() .. lf(colBlue400) .. [[\
]]Arrrghh… . What is this enabled variable?
Well, this script assembly each segment parts to build a nice statusbar.
Unneeded segments, I put on disabled variable.
This is the best parts about using conky as a lua programming language.
The assemby process looks neat and tidy.
You can change the color and segment without a lot of effort. Just edit the conky.lua, and save. The lemonbar statusbar panel will updated automatically
This is the assembly.lua code.
--[[
disabled = ''
-- .. parts.host      (colBlue400)
-- .. parts.volume    (colBlue300)
-- .. parts.separator (colBlue300, colGreen400, colBlue500)
-- .. parts.battery   (colBlue400)
-- .. parts.mem       (colBlue400)
-- .. parts.ssid      (colBlue400)
-- .. parts.network   (colBlue400)
-- .. parts.mpd       (colBlue400)
-- .. parts.date      (colBlue400)
-- .. parts.time      (colBlue400)
-- .. parts.machine   (colBlue400)
]]


enabled = ''

   .. parts.uptime    (colGreen400)
   .. parts.separator (colGreen400, colBlue500, colGreen200)
   .. parts.cpu0      (colBlue500)
   .. parts.separator (colBlue500, colGreen500, colBlue300)
   .. parts.cputemp   (colGreen500)
   .. parts.separator (colGreen500, colBlue400, colGreen300)
   .. parts.memory    (colBlue400)
There is no need to make this script simpler. No need any optimization. It is designed to be modified. Quick and Dirty.
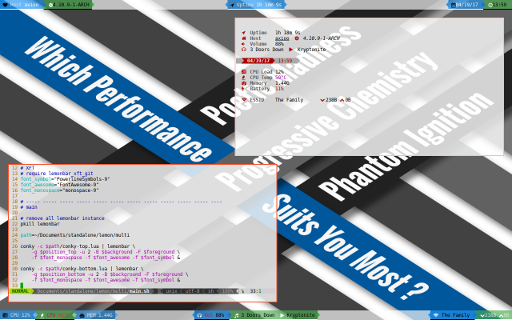
5: Real Life Lemonbar with Lua in Conky
Now the Final part. The lemonbar example for your desktop. You should see the source yourself.
$ ~/Documents/standalone/lemon/multi/main.shLemonbar only need two bars while dzen2 need six bars. For code comparation you should see both source code yourself.
Source:
Conclusion
Coding is Fun. Especially when it comes to lemonbar-conky-lua tiers.
That is all for now. Thank you for reading.
Have Fun