Preface
Goal: A guide how to write Dzen2 in Conky.
This is the continuation of dzen2 guidance. I case you have been missed it. Last week I have wrote a basic dzen tutorial using bash. And now we are going to continue with conky. It is much easier.
Article:
Reading:
Table of Content
-
Preface: Table of Content
1: Hello World in Command Line
Conky has evolved. Now conky configuration is a Lua script. So we are going to talk about Lua programming language here. And forget about the old conky style.
Reading:
Let’s do our very first conky.
Source:
conky.config = {
    out_to_x = false,
    out_to_console = true,
    short_units = true,
    update_interval = 1
}

conky.text = [[\
${time %a %b %d %H:%M:%S}\
]]
There are two parts on that script above.
The conky.config and the conky.text.
The config will be persistent during this guidance
since we only need conky capability to dump text.
And we are going to do a lot with this text.
Now let’s run this conky. Conky will dump a formatted time text every one second interval. on the command line.
$ conky -c ~/Documents/standalone/dzen2/conky-example/01.luaAnd see how the output goes through the nice command line interface.
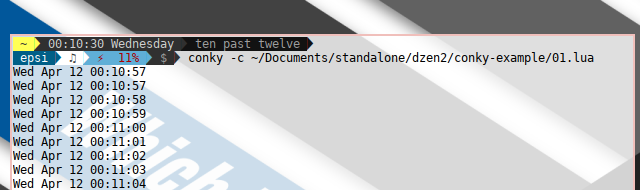
It means you can debug your output via command line interface.
2: Simple conky-dzen2 in Script
Let’s show a simple dzen2 statusbar by put this conky
in a script conky-example/01.sh.
Source:
#!/usr/bin/env bash

generated_output() {
    DIR=$(dirname "$0")
    conky -c ${DIR}/01.lua
}

# ----- ----- ----- ----- ----- ----- ----- ----- ----- ----- ----- ----
# parameters

xpos=0
ypos=0
width=640
height=24
fgcolor="#000000"
bgcolor="#ffffff"
font="-*-fixed-medium-*-*-*-12-*-*-*-*-*-*-*"

parameters="  -x $xpos -y $ypos -w $width -h $height"
parameters+=" -fn $font"
parameters+=" -ta c -bg $bgcolor -fg $fgcolor"
parameters+=" -title-name dzentop"

# ----- ----- ----- ----- ----- ----- ----- ----- ----- ----- ----- ----
# main

# remove all dzen2 instance
pkill dzen2

# execute dzen
generated_output | dzen2 $parameters &

# optional transparency
sleep 1 && exec `(transset .8 -n dzentop >/dev/null 2>&1 &)` &
Each code lines in script should be self explanatory. If you do not understand what each line does, you should go back to our previous lesson. There few things covered:
-
Pipeline in command line interface
-
Dzen2 parameters
-
BASH scripting
-
Optional transparency using either transset or transset-df
Since it require knowledge of dzen2 parameters, I suggest you this good reading.
After all, this is the output. You can see the amazingly simple dzen2 statusbar on top of the screen. With updated time every one second interval.

3: Decorating dzen2
This require knowledge of a few dzen2 tags.
-
Foreground Color:
^fg() -
Background Color:
^bg() -
Font:
^fn()We are going to use AwesomeFont to show Icons. You need to get AwseomeFont installed properly in your system. Or maybe or just put proper font in your .font directory. -
Decoration:
^i()This tag is used to show Icon from Image Glyph. But we are going to use it to make a better Powerline like statusbar.
Reading:
Here is a working example:
conky-example/02.sh and
conky-example/02.lua.
Source:
-- vim: ts=4 sw=4 noet ai cindent syntax=lua
--[[
Conky, a system monitor, based on torsmo
]]
conky.config = {
out_to_x = false,
out_to_console = true,
short_units = true,
update_interval = 1
}
--[[
Common Variables
]]
-- base color
-- escape hash (#) character in conky with slash (\#)
colWhite = '\\#ffffff'
colBlack = '\\#000000'
-- also using google material
-- https://material.io/guidelines/style/color.html
colRed500 = '\\#f44336'
colYellow500 = '\\#ffeb3b'
colBlue500 = '\\#2196f3'
colGrey500 = '\\#9e9e9e'
colGreen500 = '\\#4caf50'
colPink500 = '\\#e91e63'
colOrange500 = '\\#ff9800'
colIndigo500 = '\\#3f51b5'
colCyan500 = '\\#00bcd4'
-- http://fontawesome.io/
FontAwesome = '^fn(FontAwesome-9)'
-- icon
preIcon = '^fg(' .. colYellow500 .. ')' .. FontAwesome
postIcon = '^fn()^fg()'
-- glyph icon decoration
decoPath = 'Documents/standalone/dzen2/assets/xbm'
-- diagonal corner
decoCornerTopLeft = '^i(' .. decoPath .. '/dc-024-tl.xbm)'
decoCornerTopRight = '^i(' .. decoPath .. '/dc-024-tr.xbm)'
decoCornerBottomLeft = '^i(' .. decoPath .. '/dc-024-bl.xbm)'
decoCornerBottomRight = '^i(' .. decoPath .. '/dc-024-br.xbm)'
-- single arrow and double arrow
decoSingleArrowLeft = '^i(' .. decoPath .. '/sa-024-l.xbm)'
decoSingleArrowRight = '^i(' .. decoPath .. '/sa-024-r.xbm)'
decoDoubleArrowLeft = '^i(' .. decoPath .. '/da-024-l.xbm)'
decoDoubleArrowRight = '^i(' .. decoPath .. '/da-024-r.xbm)'
--[[
Segment
]]
-- date
dateIcon = ' ' .. preIcon .. '' .. postIcon .. ' '
datePre = '^bg(' .. colIndigo500 .. ')'
.. '^fg(' .. colYellow500 .. ')'
dateCommand = '^fg(' .. colWhite .. ')${time %a %b %d} '
datePost = '^bg()^fg()'
dateDecoPre = '^bg(' .. colIndigo500 .. ')'
.. '^fg(' .. colWhite .. ')' .. decoCornerTopLeft
dateDecoPost = '^bg(' .. colWhite .. ')'
.. '^fg(' .. colIndigo500 .. ')' .. decoCornerBottomLeft
dateText = dateDecoPre .. datePre .. dateIcon
.. dateCommand .. datePost .. dateDecoPost
-- time
timeIcon = ' ' .. preIcon .. '' .. postIcon .. ' '
timePre = '^bg(' .. colPink500 .. ')'
timeCommand = '^fg(' .. colWhite .. ')${time %H:%M:%S} '
timePost = '^bg()'
timeDecoPre = '^bg(' .. colWhite .. ')'
.. '^fg(' .. colPink500 .. ')' .. decoDoubleArrowLeft
timeDecoPost = '^bg(' .. colWhite .. ')'
.. '^fg(' .. colPink500 .. ')' .. decoDoubleArrowRight
timeText = timeDecoPre .. timePre .. timeIcon
.. timeCommand .. timePost .. timeDecoPost
--[[
Execute Conky
]]
conky.text = [[\
]] .. dateText .. [[\
\
]] .. timeText ..[[\
]]Just run it, and now you can see the output. Not a very pretty decoration. But I guess you get my point. Dzen output is amazingly very flexible to be configured.

4: Create Decoration for Your own Suite
Everybody has different requirement, taste and style.
Instead of giving .xbm files,
I’d better give the Source Image. And explain the creation process.

Article:
The creation process has been explained in previous chapter. I only use use Inkscape and GIMP with very few steps. And yeah, very simple process.
XBM:
5: Dzen2 with Modularized Lua in Conky
“Let’s be tidy and get organized.”
We are going to make this Lua script themable with flexible segment monitoring statusbar. I have made quick-and dirty-scripts. It means you are free to accustomize the script for your quick-and-dirty needs. It is never intended to be a perfect script. It just works.
Le’ts see the file structure. It contains:
-
Main BASH script, top pipe Conky to Dzen2:
main.sh. -
A Conky Configuration Resource, as a script entry point:
conky.lua. You can freely modify this conky by changing theme (preset and assembly). -
Two submodule libraries:
helper.luaandparts.lua. -
One asset contain Google Material Color for convenience:
gmc.lua. -
Two Themable Paths:
presetsfor color andassemblies. You can make your own preset and assembly.
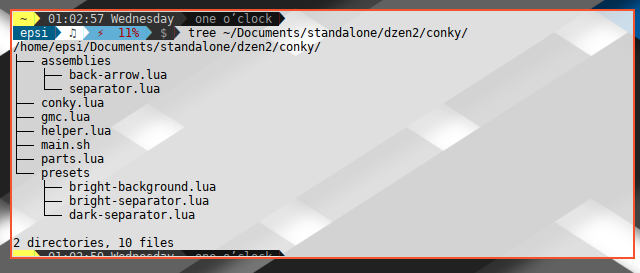
The entry point conky.lua is very simple. I have put all the stuff in libraries.
Source:
conky.config = {
    out_to_x = false,
    out_to_console = true,
    short_units = true,
    update_interval = 1
}

presetName  = 'bright-background'
assemblyName = 'back-arrow'

local dirname  = debug.getinfo(1).source:match("@?(.*/)")

dofile(dirname .. 'gmc.lua')
dofile(dirname .. 'presets/' .. presetName .. '.lua')
dofile(dirname .. 'helper.lua')
dofile(dirname .. 'parts.lua')
dofile(dirname .. 'assemblies/' .. assemblyName .. '.lua')

conky.text = [[\
]] .. enabled .. [[\
]]
The color preset is just simpler.
Source:
colorPreset = {
  icon       = colYellow500,
  label      = colPink700,
  separator  = colBlue900,
  value      = colBlack,
  background = colBlue500
}
Before we go to far, and got you a headache, let’s see how the dzen2 output goes.

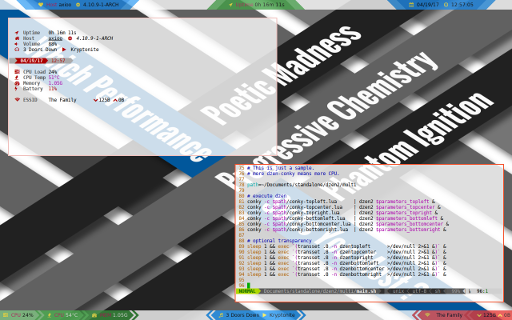
6: Assembly the Parts
Let’s assembly each segment parts to build a nice statusbar. This is the best parts about using conky as a lua programming language. The assemby process looks neat and tidy.
The image above is simply an output of
this assemblies/separator.lua configuration.
Source:
enabled = ''
    .. parts.host()
    .. parts.volume()
    .. parts.cpu0()
    .. parts.ssid()
    .. parts.network()
    .. helper.separator()
You can change the color preset and dzen parameter to achieve other theme without a lot of effort. Just edit the conky.lua, and save. The dzen2 statusbar panel will updated automatically following the selected theme.

Here is another sample to create a bright back arrow without making a lot of effort.
assemblies/back-arrow.lua configuration.
Source:
deco = helper.decoDoubleArrowLeft

enabled = ''
    .. parts.transition(deco, colWhite, colGreen400)
    .. parts.host(colGreen400)
    .. parts.transition(deco, colGreen400, colGreen500)
    .. parts.volume(colGreen500)
    .. parts.transition(deco, colGreen500, colGreen600)
    .. parts.cpu0(colGreen600)
    .. parts.transition(deco, colGreen600, colBlue500)
    .. parts.ssid(colBlue500)
    .. parts.transition(deco, colBlue500, colBlue600)
    .. parts.network(colBlue600)
.. parts.transition(deco, colBlue600, colWhite)![]()
You can create you own theme based on this. And for me, there is a lot of things about dzen2 and conky that I haven’t covered yet. This deserve a specific article focused on each topic. I simply do not have time to optimize the theme. It is just a quick and dirty solution.
7: Real Life Dzen2 with Lua in Conky
Now the Final part. The dzen2 statusbar example for your desktop.
$ ~/Documents/standalone/dzen2/multi/main.shDzen2 need six bars, while lemonbar only need two bars. For code comparation you should see both source code yourself.
Source:
Conclusion
Coding is Fun. Especially when it comes to dzen2-conky-lua tiers. Now I have to move on to compose the next tutorial.
That is all for now. Thank you for reading.
Have Fun