Preface
Goal: Share common configuration for terminal customization.
Terminal ricing is different in with desktop ricing. While in desktop ricing we deal with: window manager, panel, notification and the most ingredient called wallpaper. Terminal ricing deal with: shell, prompt, pixel-art, and multiplexer. Terminal ricing along with CLI application, are part of desktop ricing.
This guidance applied for most distribution.
Screenshot
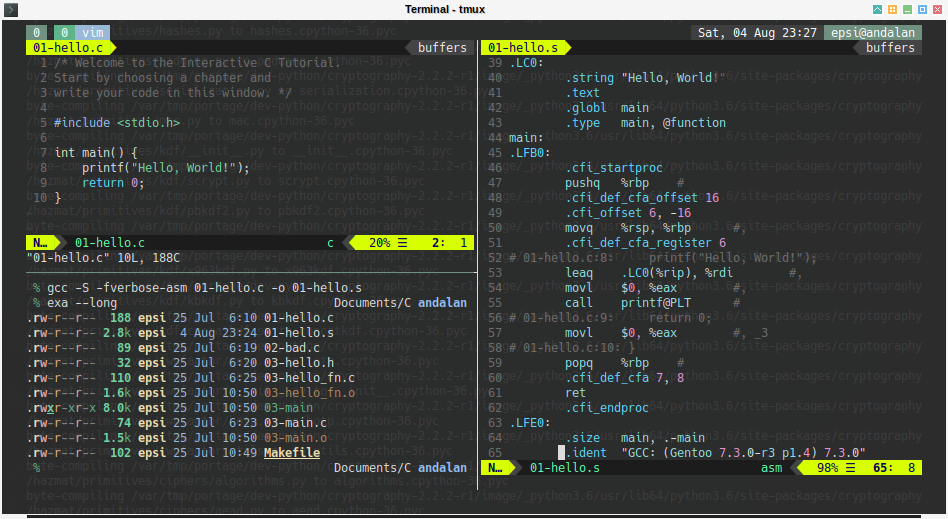
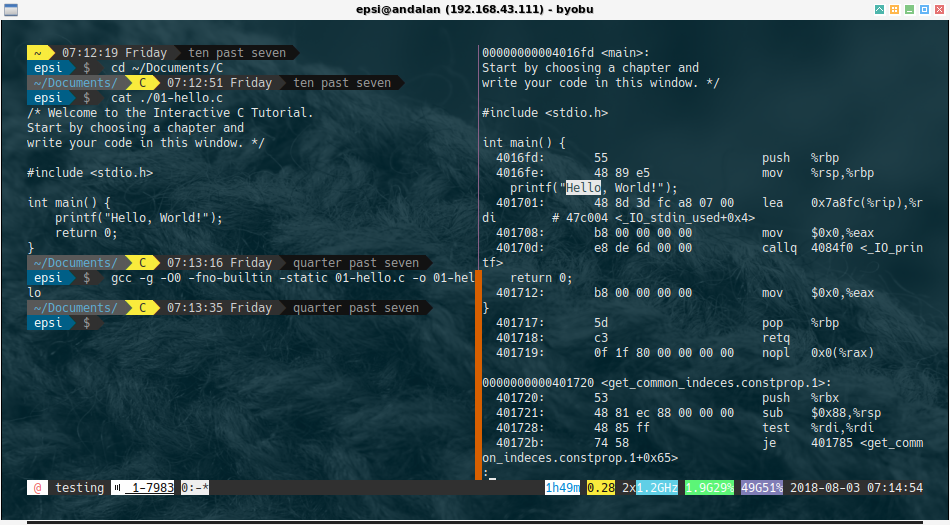
I intentionally use scary command with scary output to get the hackish screenshot feeling. Hackish here, I mean hack in computer context, not amateur writing context.
The terminal is using other terminal as background, not a wallpaper.
The other terminal is doing actual compilation.
Compilation give the screenshot more hackish looks.
The code is, actually just hello world for beginner.
Not too much effort, but works for me.
Table of Content
-
Preface: Table of Content
-
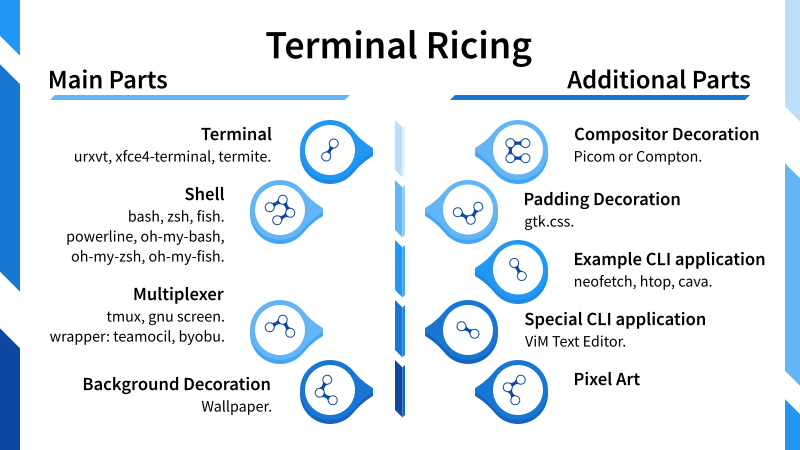
Parts in terminal ricing:
-
Terminal: urxvt, xfce4-terminal, termite
-
Shell: bash, zsh, fish
-
Shell Prompt: powerline, oh-my-bash, oh-my-zsh, oh-my-fish
-
Multiplexer: tmux, gnu screen
-
Multiplexer Wrapper: teamocil, byobu
-
Compositor Decoration: Compton
-
Padding Decoration: gtk.css
-
Background Decoration: Wallpaper
-
Example CLI application: neofetch
-
Special CLI application: ViM Text Editor
-
Dofiles Source
The dotfiles are available at:
Path
Where to put the config, for each part ?
| Category | Part | Path |
|---|---|---|
| terminal | urxvt | ~/.Xresources, ~/.Xdefaults |
| terminal | termite | ~/.config/termite/config |
| shell | oh-my-bash | ~/.bashrc |
| shell | oh-my-zsh | ~/.zshrc |
| shell | powerline | ~/.config/powerline/*, ~/.bashrc, ~/.config/fish/config.fish |
| tiling | tmux | ~/.tmux.conf |
| tiling | teamocil | ~/.teamocil/jekyll.yml |
| decoration | compton | ~/.config/compton.conf |
| decoration | gtk-3.0 | ~/.config/gtk-3.0/gtk.css |
| application | vim | ~/.vim/*, ~/.vimrc |
| application | neofetch | ~/.config/neofetch/config.conf |
Visual Summary
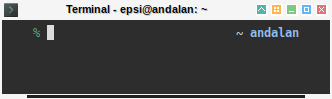
Terminal
Not all terminal emulator is suitable for ricing
There are as many choice as listed below:
The issue is, not all terinal emulator is suitable for ricing. In ricing world, less is more, no need any fancy border, scrollbar and menu. But at the same time, the terminal needs flexbility when it comes to colorscheme.
Most choices comes to these three terminals:
-
urxvt: My favorite is
rxvt unicode, but sometimes it has trouble with font setting, such as arrow in ViM when using bold fonts. -
xfce4-terminal: It just works, and stable. It has GUI based configuration. But not many customizable colorscheme.
-
termite: I rarely use it. This emulator is now widely used in most distro. And it also have compilation time dependencies with mono.
urxvt configuration
This is a long topic, so I put it separately below.
xfce4-terminal configuration
This is GUI based config. I nevert touch the config manually.
termite configuration
| Config | Path |
|---|---|
| termite | ~/.config/termite/config |
Source:
It was originally frtom my friend morgareth, but I cannot find the dotfiles any longer.
urxvt configuration
You can use two configs, or just one merged config:
| Config | Path |
|---|---|
| urxvt | ~/.Xresources, ~/.Xdefaults |
You can load using xrdb.
$ xrdb ~/.XresourcesSource:
My config are originally grabbed from these my two friends:
colors
Using .Xdefaults or .Xresources.
! ############
! # based on #
! # blackcat #
! #  night   #
! ############

*background:   #121212
*foreground:   #E8E8E8

! BLK
*color0:       #141212
*color8:       #404040

! RED
*color1:       #EC5C5C
*color9:       #EC5C5C

! GRN
*color2:       #5CF577
*color10:      #5CF577

! YLW
*color3:       #F9EB3D
*color11:      #F9EB3D

! BLU
*color4:       #0286D5
*color12:      #0286D5

! MAG
*color5:       #807DB6
*color13:      #807DB6

! CYN
*color6:       #60CFE6
*color14:      #60CFE6

! WHT
*color7:       #FEFEFE
*color15:      #FEFEFE
You can grab more color from dotshare.
more resources
Using .Xdefaults or .Xresources.
! ############
! #  COLORS  #
! ############
! # based on #
! # rukavera #
! ############

! special
*.foreground:     #adb2c2
! *.background:     #03262b
! *.background:     #eeeeee
! *.cursorColor:    #adb2c2


! - For real transparency (composite):
urxvt*depth: 32
urxvt.background: [80]#03262b
! urxvt*background: rgba:0000/0000/0200/c800

! - For fake transparency:
! urxvt*transparent: true
! urxvt*shading: 30

URxvt.intensityStyles:  false
!URxvt.font:             xft:Hack:bold:pixelsize=12
!URxvt.boldFont:         xft:Hack:bold:pixelsize=12

!! Hack
URxvt.font:             xft:Hack:bold:pixelsize=12;hinting=True;antialias:True,\
                        xft:PowerlineSymbols,\
                        xft:FontAwesome:size=10,\
                        xft:WenQuanYi Bitmap Song-12:medium;antialias=False,\
                        xft:WenQuanYi Zen Hei-12:medium;antialias=True,\
                        xft:HanaMinA-12:medium;antialias:True,\
                        xft:HanaMinB-12:medium;antialias:True,\
                        xft:HanaMinPlus-12:medium;antialias:True
URxvt.boldFont:         xft:Hack:bold:pixelsize=12;hinting=True;antialias:True,\
                        xft:FontAwesome:size=10,\
                        xft:WenQuanYi Bitmap Song-12:bold;antialias=False,\
                        xft:WenQuanYi Zen Hei-12:bold;antialias=True,\
                        xft:HanaMinA-12:bold;antialias:True,\
                        xft:HanaMinB-12:bold;antialias:True,\
                        xft:HanaMinPlus-12:bold;antialias:True
!

URxvt.saveLines:        8192

URxvt*scrollTtyOutput:    false
URxvt*scrollWithBuffer:   true
URxvt*scrollTtyKeypress:  true
URxvt.scrollBar:          false
URxvt.internalBorder:     25
URxvt.cursorBlink:        false
URxvt.cursorUnderline:    true
! URxvt.scrollBar: false
! URxvt.scrollBar_right: false

Xft.dpi:        96
Xft.antialias:  true
Xft.rgba:       rgb
Xft.hinting:    true
Xft.hintstyle:  hintslight

! ############
! # based on #
! # blackcat #
! ############

! URxvt.perl-ext-common: default, tabbed

! URxvt.keysym.Control-Alt-C: perl:clipboard:copy
! URxvt.keysym.Control-Alt-V: perl:clipboard:paste

URxvt.letterSpace: -1
!URxvt.lineSpace: 1

URxvt.termName: rxvt-unicode
URxvt.geometry: 115x24+366+211

!URxvt.transparent: true
!URxvt.shading: 5
!URxvt.fadecolor: #0c0c0c
!URxvt.fading: 30
!URxvt.depth: 32

URxvt.saveLine: 10000
URxvt.iso14755: false
URxvt.iso14755_52: false

!URxvt.highlightColor:
!URxvt.hightlightTextColor:

URxvt.url-select.launcher: firefox
URxvt.url-select.underline: true

URxvt.loginShell: true
And you can grab more .Xresources example,
also from dotshare.
urxvt extension
I never try this, but this is seems cool.
Shell and Shell Prompt
Shell are part of operating system. There are many shells, most commonly used are:
you can switch the default shell by this command:
$ chsh -s /bin/zshFor each shell, it has ready to use customizable prompt configuration:
-
BASH: oh-my-bash (ohmybash.github.io)
-
FISH: oh-my-fish
-
BASH bash-it
But there are also a unique arrow prompt called powerline.
It needs special config. An it is also highly customizable.
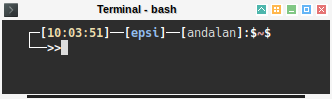
.bashrc prompt
This is my colorful bashrc.
#
# ~/.bashrc
#

# If not running interactively, don't do anything
[[ $- != *i* ]] && return

alias ls='ls --color=auto'
PS1='[\u@\h \W]\$ '

echo

printf "\033[0m
    \033[49;35m|\033[49;31m|\033[101;31m|\033[41;97m|\033[49;91m|\033[49;93m|\033[0m
  \033[105;35m|\033[45;97m|\033[49;97m||\033[100;97m||\033[49;37m||\033[103;33m|\033[43;97m|\033[0m
  \033[49;95m|\033[49;94m|\033[100;37m||\033[40;97m||\033[40;37m||\033[49;33m|\033[49;32m|\033[0m
  \033[104;34m|\033[44;97m|\033[49;90m||\033[40;39m||\033[49;39m||\033[102;32m|\033[42;97m|\033[0m
    \033[49;34m|\033[49;36m|\033[106;36m|\033[46;97m|\033[49;96m|\033[49;92m|\033[0m

"

my_t="[\e[1;33m\t\e[01;37m]"
my_u="[\[\e[1;34m\u\e[01;37m\]]"
my_h="[\[\e[00;37m\]${HOSTNAME%%.*}\[\e[01;37m\]]"
my_w="$\[\e[01;31m\]\w\[\e[01;37m\]"
my_n="$\[\e[01;31m\]\n\[\e[01;37m\]"
export PS1="\[\e[01;37m\]┌─${my_t}──${my_u}──${my_h}:${my_w}${my_n}└──\[\e[01;37m\]>>\[\e[0m\]"
You can grab more .bashrc from dotshare.
.zshrc prompt
You can grab more .zshrc from dotshare.
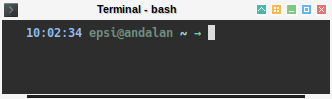
oh-my-bash configuration
With this oh-my-bash prompt theming framework,
the code above could be transformed into simple code.
# Path to your oh-my-bash installation.
export OSH=/home/epsi/.oh-my-bash

# Set name of the theme to load. Optionally, if you set this to "random"
# it'll load a random theme each time that oh-my-bash is loaded.
OSH_THEME="font"

# Add wisely, as too many plugins slow down shell startup.
plugins=(core git bashmarks progress)

if tty -s
then
  source $OSH/oh-my-bash.sh
fi
Do not forget to set the right path.
| Config | Path |
|---|---|
| bash | ~/.bashrc |
Source:
oh-my-zsh configuration
# Path to your oh-my-zsh installation.
export ZSH=/home/epsi/.oh-my-zsh

# See https://github.com/robbyrussell/oh-my-zsh/wiki/Themes
ZSH_THEME="terminalparty"
# robbyrussell afowler fino kardan nanotech philips re5et simonoff sporty256
# terminalparty tjkirch tonotdo wezm adben af-magic

# Add wisely, as too many plugins slow down shell startup.
plugins=(
  git
)

source $ZSH/oh-my-zsh.sh

# alias
alias jekyll-blog='jekyll serve --config _config.yml,_config_dev.yml'
Do not forget to set the right path.
| Config | Path |
|---|---|
| zsh | ~/.zshrc |
Source:
Iterate Theme for oh-my-bash
One of my issue with oh-my-bash is that I cannot find preview for each theme. But do not worry, there is a workaround. Even better, we can see each theme live, in action for each theme. If you ever wonder how to get the looks of each oh-my-bash theme easily, I made a script for you to play with.
This method also applied with oh-my-zsh.
powerline configuration
There are many files that can be configured in this powerline directory:
To use powerline, add it in your .bashrc, or .zrc.
powerline-daemon -q
POWERLINE_BASH_CONTINUATION=1
POWERLINE_BASH_SELECT=1
. /usr/lib/python3.6/site-packages/powerline/bindings/bash/powerline.sh
Or .config/fish/config.fish.
powerline-daemon -q
set POWERLINE_BASH_CONTINUATION 1
set POWERLINE_BASH_SELECT 1
set fish_function_path $fish_function_path "/usr/lib/python3.6/site-packages/powerline/bindings/fish"
powerline-setup
Do not forget to set the right path.
| Config | Path |
|---|---|
| bash | ~/.bashrc |
| fish | ~/.config/fish/config.fish |
Multiplexer
There are two widely used terminal multiplexer. In fact I only know this two.
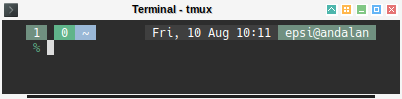
tmux configuration
tmux can have a very nice statusbar, that can be set on top or bottom of your terminal.
set -g mouse on

######################
### DESIGN CHANGES ###
######################

# loud or quiet?
set-option -g visual-activity off
set-option -g visual-bell off
set-option -g visual-silence off
set-window-option -g monitor-activity off
set-option -g bell-action none

#  modes
setw -g mode-attr bold

# messages
set -g message-attr bold

#### http://dotshare.it/dots/8268/0/raw/

# Mode
set-option -g mode-bg brightblack
set-option -g mode-fg default

# Status position
set-option -g status-position top

# Status update interval
set-option -g status-interval 5

# Basic status bar colors
set-option -g status-bg default
set-option -g status-fg white

# Left side of status bar
set-option -g status-left-length 40
set-option -g status-left "#[fg=brightwhite,bg=brightblack] #S #[fg=default,bg=default] "

# Window status
set-option -g window-status-format "#[fg=white,bg=brightblack] #I #[fg=white,bg=black] #W "
set-option -g window-status-current-format "#[fg=brightwhite,bg=green] #I #[fg=brightwhite,bg=blue] #W "
set-option -g window-status-separator " "
set-option -g status-justify left

# Right side of status bar
set-option -g status-right-length 40
set-option -g status-right " #[fg=brightwhite,bg=black] %a, %d %b %H:%M #[fg=brightwhite,bg=brightblack] #(whoami)@#h "

# Pane border
set-option -g pane-border-bg default
set-option -g pane-border-fg brightblack
set-option -g pane-active-border-bg default
set-option -g pane-active-border-fg white

# Pane number indicator
set-option -g display-panes-colour brightblack
set-option -g display-panes-active-colour brightwhite

# Clock mode
set-option -g clock-mode-colour white
set-option -g clock-mode-style 24

# Message
set-option -g message-bg default
set-option -g message-fg default
Do not forget to set the right path.
| Config | Path |
|---|---|
| tmux | ~/.tmux.conf |
Source:
I like to copy the tmux config from dotshare.
gnu screen configuration
I do not use gnu screen. However you can grab the config from dotshare.
Multiplexer Wrapper
Beyond the multiplexer, there are also ready to use application that manage previous tools
-
teamocil: using tmux as backend, managing layout.
-
byobu: using either tmux or gnu screen backend, not managing layout.
byobu screenshot
I do not configure byobu. But if you widh, this is my screenshot.
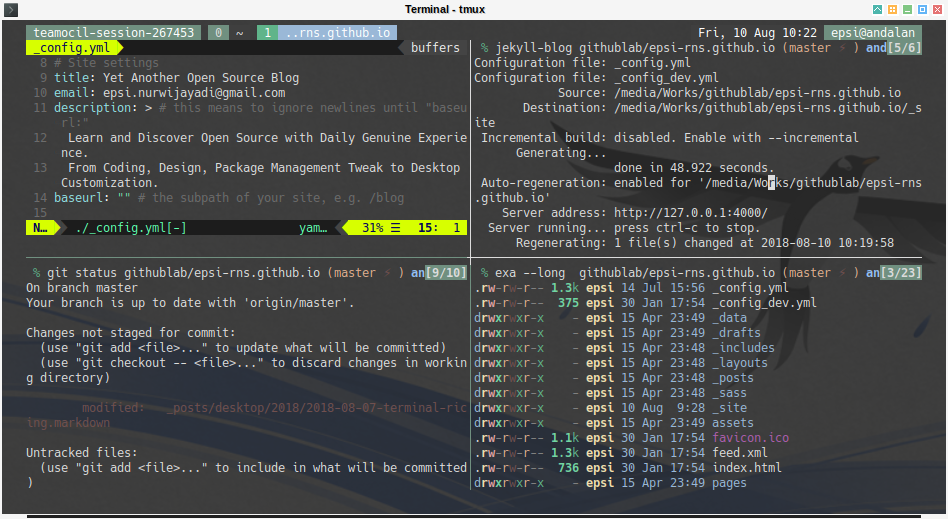
teamocil configuration
Teamocil is a simple tool used to automatically create windows and panes in tmux with YAML files.
I’m using Jekyll for daily basis blogging. Instead of typing the same command over and over again, using teamocil can be helpful.
windows:
  - name: sample-four-panes
    root: /media/Works/githublab/epsi-rns.github.io
    layout: tiled
    panes:
      - vim -M ./_config.yml
      - jekyll-blog
      - git status
- exa --long| Config | Path |
|---|---|
| teamocil | ~/.teamocil/jekyll.yml |
This is the configuration:
And last, my screenshot for my real daily basis blogging. Well.. this not really a ricing, but more on productivity.
Compositor
compositor for transparency
You need compositor to enable transparency, shadow and such effects. There are two known compositor for ricing:
Simply run compton to enable it.
$ compton &compton configuration
# Opacity
menu-opacity = 0.9;
#inactive-opacity = 0.7;
frame-opacity = 0.7;
inactive-opacity-override = false;
alpha-step = 0.06;| Config | Path |
|---|---|
| compton | ~/.config/compton.conf |
Source
picom configuration
# https://wiki.archlinux.org/index.php/Picom

opacity = 0.7;          # menu
inactive-opacity = 0.9; # application: such as inactive browser
fade-out-step  = 0.01;
fade-in-step   = 0.01;

backend = "glx";

dropdown_menu = { shadow = false; };
popup_menu    = { shadow = false; };
utility       = { shadow = false; };

shadow = true;
shadow-radius   = 20;
shadow-opacity  = 1;
shadow-offset-x = -20;
shadow-offset-y = -20;

shadow-exclude = [
  "class_g = 'slop'"
]

wintypes:
{
  dock = { shadow = false };
};

unredir-if-possible = true;
blur-background = true;


blur:
{
  method = "kernel";
  size = 50;
  deviation = 5.0;
};

shadow-exclude-reg = "x40+0+0"
gtk.css
Terminal can have padding using gtk.css Setting this padding would make your terminal way cooler. The padding config is as simply as:
VteTerminal, vte-terminal {
	padding: 5px 24px 24px 24px;
}| Config | Path |
|---|---|
| gtk.css | ~/.config/gtk-3.0/gtk.css |
Source
A more complete config can be seen here:
Background
Well .. well.. well… Wallpaper is the most ingredient in ricing. You are free to use any wallpaper
But there are other trick as well.
custom wallpaper
I also make custom wallpaper at deviantart.
Or here, right to the SVG source in github:
hackish style
I like to use other terminal as background. The background terminal contain compilation.
This would make a very hackish style effect, as shown in most top picture above.
Example CLI application
There are many CLI application such as
-
Music visualizer: CAVA
-
System information: neofetch, screenfetch
-
System Monitoring: htop, gtop
-
exa: colorful rust based ls
This is not the place to explain detail for this CLI applications.
However, this is most commonly use neofetch custom config is a must:
| Config | Path |
|---|---|
| neofetch | ~/.config/compton.conf |
ViM as Special CLI application
Vim is an advanced text editor
This is also a must have config.
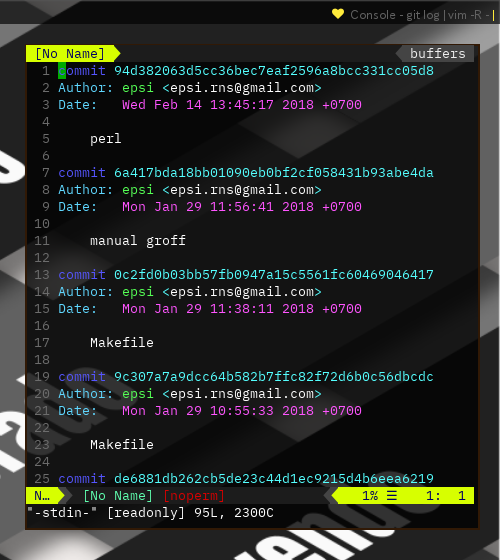
The preivous screenshot is running a cool command, that you can also for your screenhot setup.
$ git log | vim -R -vimrc configuration
This is my current vimrc.
" -- -- ViM Standard -- --

set number
syntax on
set encoding=utf-8

" -- -- ViM UI -- --

set background=dark
set t_Co=256
if &term =~ '256color'
  " Disable Background Color Erase (BCE) so that color schemes
  " work properly when Vim is used inside tmux and GNU screen.
  " See also http://snk.tuxfamily.org/log/vim-256color-bce.html
  set t_ut=
endif

set laststatus=2 " always show the status line
set lazyredraw " do not redraw while running macros
set showbreak=↪ " indicate wrapped line
hi clear ModeMsg " Disable Color StatusLine on Insert Mode and Visual Mode

" -- -- Vundle Begin -- --

set nocompatible              " be iMproved, required
filetype off                  " required

" set the runtime path to include Vundle and initialize
set rtp+=~/.vim/bundle/Vundle.vim
call vundle#begin()

" -- -- Vundle Plugin -- --

" let Vundle manage Vundle, required
Plugin 'VundleVim/Vundle.vim'

Plugin 'scrooloose/nerdtree'

" Plugin 'Lokaltog/powerline'


Plugin 'flazz/vim-colorschemes'
Plugin 'vim-airline/vim-airline'
" Plugin 'vim-airline/vim-airline-themes'


Plugin 'rstacruz/sparkup', {'rtp': 'vim/'}

" -- -- Vundle End -- --

" All of your Plugins must be added before the following line
call vundle#end()            " required
filetype plugin indent on    " required

" -- -- GUI Settings -- --

autocmd GUIEnter * set guioptions-=m
autocmd GUIEnter * set guioptions-=T
"autocmd GUIEnter * set gfn=Bitstream\ Vera\ Sans\ Mono\ 10
autocmd GUIEnter * set gfn=Monaco\ for\ Powerline\ 10
let g:Powerline_symbols = 'fancy'
set rtp+=~/.vim/bundle/powerline/powerline/bindings/vim
autocmd GUIEnter * set vb t_vb= " disable visual bell
let g:airline#extensions#tabline#enabled = 1
let g:airline_powerline_fonts = 1
" let g:airline_theme='powerlineish'

" -- -- colorscheme -- --

colorscheme ir_black
" colorscheme evening
" colorscheme molokai

" -- -- NERDTree -- --

let NERDTreeShowHidden=1| Config | Path |
|---|---|
| vimrc | ~/.vimrc |
Source:
I copy the config from my friend bandithijo, and strip down to suit my needs.
There are more ViM rc at dotshare.
vim path
There are two directories in this ViM directory:
| Config | Path |
|---|---|
| vim | ~/.vim/* |
There are more ViM colors at dotshare.
Learning ViM
Beside the basic vimtutor, you might want to
learn ViM script the hard way.
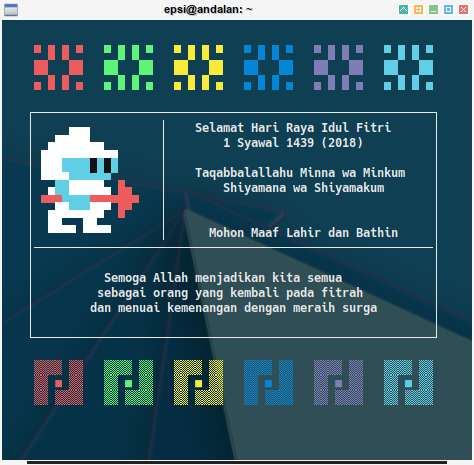
Pixel Art
You can see my pixelart repository on bitbucket here:
The repository is a compilation from this good thread:
Example of Pixelart Greeting
Conclusion
That is all.
Thank you for reading and visiting.