Preface
Tutor One: PNG Solid Border, Very Basic, No Design Yet.
Table of Content
-
Preface: Table of Content
-
2: First Theme
1: Unified Graphic Material
This is the Inkscape Part.
First Inkscape Document
Consider make your first inkscape document.
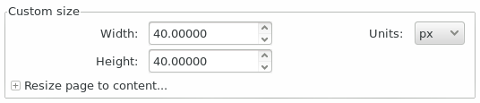
Open Inkscape, set custom size in document properties.
SVG Source
SVG source available at:
Document Properties
It can be done from menu (File - Document Properties). Or just press (Shift+Ctrl+D).
-
Default Units: px
-
Units: px
-
Width: 40 px
-
Height: 40 px
Save
Name it as tutor-01-active.svg, or anything you desire.
Layers
Prepare Three Layers. Open Layers Dock (Shift+Ctrl+L).
-
Frame: This is where we define export target name
-
Background: (optional), any solid background is fine, this should cover the size of page, such as 40 px * 40 px .
-
Name: (optional) for use to identify, such as [left, right, bottom, 1, 2, 3 ,4 5]
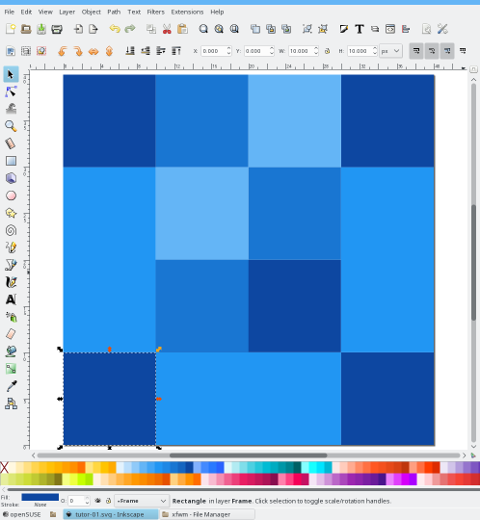
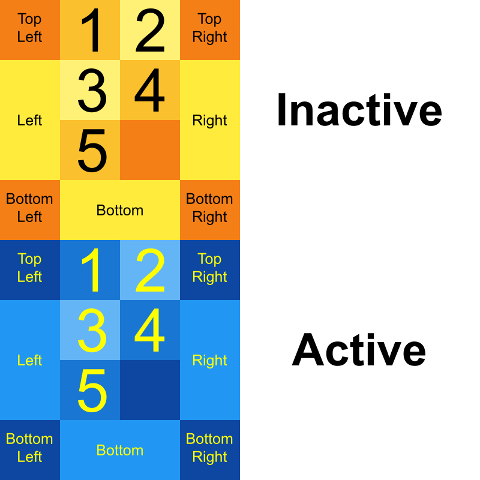
Frame Layer
We are using 10px border for this theme.
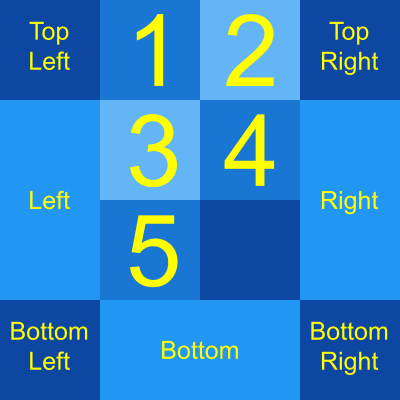
Create Box, each with [Width * Height]
-
Bottom Left: [10px * 10px]
-
Bottom Right: [10px * 10px]
-
Top Left: [10px * 10px]
-
Top Right: [10px * 10px]
-
Bottom: [20px * 10px]
-
Left: [10px * 20px]
-
Right: [10px * 20px]
-
Each [1, 2, 3, 4, 5]: [10px * 10px]
You may use any color. But I prefer google material color blue300 (#64b5f6ff), blue500 (#2196f3ff), blue700 (#1976d2ff), blue900 (#0d47a1ff).
Export Page
Export the whole page can be done from menu (File - Export PNG Image). Or just press (Shift+Ctrl+E).
Choose Page Tab to export the whole page.
Slices
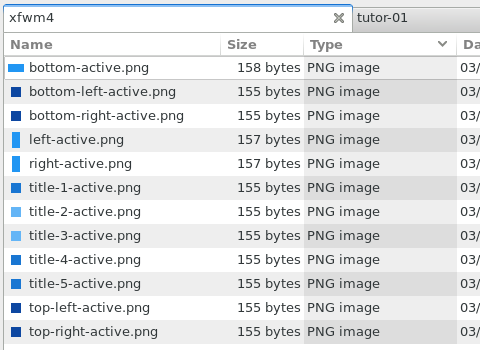
Hint: Use Inkscape’s Batch Export, to export all shapes at once.
Select each box in frame layer, you should see tab changing to selection in Export Dock.
For each box, name the target file as the corresponding box such as bottom-left-active.png, and export the box to PNG.

You should see the result in file manager.
2: First Theme
This is the XFWM Part.
Configuration
Beside PNG (or XPM), XFWM4 theme require themerc.
I won’t go deep, since there are already many tutorial about this on the internet.
Mine was grabbed (copy-paste) from the default XFCE4 theme.
active_text_color=active_text_color_1
active_text_shadow_color=active_hilight_1

inactive_text_color=inactive_text_color_2
inactive_text_shadow_color=inactive_hilight_2

button_offset=2
button_spacing=0

full_width_title=true

maximized_offset=0
show_app_icon=true
shadow_delta_height=-6
shadow_delta_width=-10
shadow_delta_x=-12
shadow_delta_y=-12
shadow_opacity=100

title_horizontal_offset=1
title_shadow_active=under
title_shadow_inactive=under
title_vertical_offset_active=1
title_vertical_offset_inactive=1

button_layout=O|TSHMC
Title Font
I set font size to 0 to hide title.
./themes
In order to use the theme, you should copy the content of xfwm4 directory to
~/.themes/tutor-01/xfwm4.
Window Manager Setting
Now you can set the theme for the Window Manager.
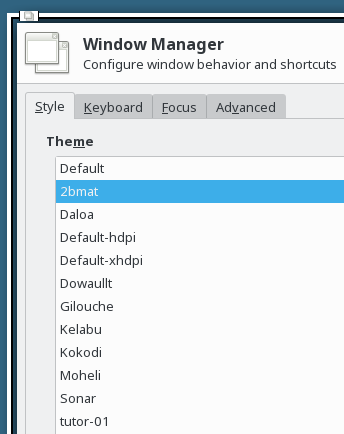
Choose tutor-01.
Result
Voila, you have your first theme. Congratulation. Felicitationes.
But wait, it is not finished yet sir. This is just the active Window, you also need to setup the inactive window.
3: Inactive Border
Consider go back to inkscape
-
duplicate the previous active border
-
move to 40px vertical
-
change the frame color to yellow300 (#fff176ff), yellow500 (#ffeb3bff), yellow700 (#fbc02dff), yellow900 (#f57f17ff).
-
For each box, name the target file as the corresponding box such as
top-right-inactive, and export the PNG. -
Copy the content of xfwm4 directory to
./theme
Now, set the theme for the Window Manager, to other than tutor-01 such as default.
After that, reset to tutor-01. You should see the result of inactive border, immediately.
Result
We are done with our very first step.
What’s Next
Tutor Two, the solid XPM border. We are going to utilize XPM instead of PNG. Consider also reading [ Part Two ].