Preface
Goal: Show the Herbstclient Tag.
Focusing in "herbstclient tag_status".
This tutorial cover Lemonbar, and in order to use Dzen2, any reader could use the source code in github.
Table of Content
-
Preface: Table of Content
-
2: Get Geometry
Reference
Reading
Before you jump off to scripting, you might desire to read this overview.
All The Source Code
Impatient coder like me, like to open many tab on browser.
-
Lemonbar: gitlab.com/…/dotfiles/…/ruby/
Screenshot
Since window manager is out of topic in this tutorial, I present only panel HerbstluftWM screenshot.
Dzen2

Lemonbar

1: Directory Structure
Directory Structure has been explained in preface.
For both Dzen2 and Lemonbar, the structure are the same.
This figure will explain how it looks
in Ruby script directory.
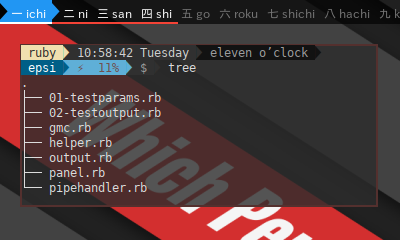
Special customization can be done in output script, without changing the whole stuff.
2: Get Geometry
Let’s have a look at helper.rb in github.
View Source File:
Get Script Argument
The original herbstluftwm panel example, contain statusbar for each monitor. The default is using monitor 0, although you can use other monitor as well.
$ ./panel.rb 0I do not implement statusbar in multi monitor since I only have my notebook. But I’ll pass the argument anyway for learning purpose.
Here it is our code in Ruby. We do not need to call return in Ruby, the value of the last line will be a function return.
helper.rb
# script arguments
def get_monitor(arguments)
  # ternary operator
  arguments.length > 0 ? arguments[0].to_i : 0
end
And in main code we can call
require_relative 'helper'

monitor = get_monitor(ARGV)
puts(monitor)
This will display 0 or else such as 1,
depend on the script argument given.
0Get Monitor Geometry
HerbstluftWM give this little tools to manage monitor geometry by getting monitor rectangle.
$ herbstclient monitor_rectThis will show something similar to this.
0 0 1280 800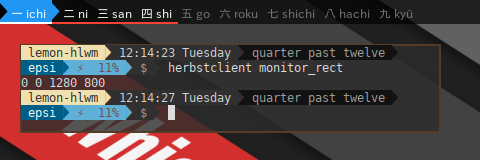
Consider wrap the code into function. And get an array as function return.
helper.rb
def get_geometry(monitor)
  raw = IO.popen('herbstclient monitor_rect '+ monitor.to_s).read()

  if raw.to_s.empty?
    print('Invalid monitor ' + monitor.to_s)
    exit(1)
  end

  raw.split(' ')
end
Consider call this function from script later.
To print array in Ruby,
we just have to wrap it in geometry.join(' ').
monitor = get_monitor(ARGV)
geometry = get_geometry(monitor)
puts(geometry.join(' '))
This will produce
0 0 1280 800Get Panel Geometry
The Panel geometry is completely depend on the user flavor and taste. You can put it, on top, or bottom, or hanging somewhere. You can create gap on both left and right.
Consider this example:
helper.rb
def get_bottom_panel_geometry(height, geometry)
  # geometry has the format X Y W H
  return geometry[0].to_i + 24, (geometry[3].to_i - height),
         geometry[2].to_i - 48, height
end
We are going to use this X Y W H,
to get lemonbar parameter.
panel_height = 24
monitor = get_monitor(ARGV)
geometry = get_geometry(monitor)
xpos, ypos, width, height = get_bottom_panel_geometry(
    panel_height, geometry)

puts('Lemonbar geometry: ' \
      + "#{width}x#{height}+#{xpos}+#{ypos}")
This will show something similar to this result, depend on your monitor size.
Lemonbar geometry: 1280x24+24+776Get Lemonbar Parameters
We almost done. This is the last step. We wrap it all inside this function below.
helper.rb
def get_lemon_parameters(monitor, panel_height)
  # calculate geometry
  geometry = get_geometry(monitor)
  xpos, ypos, width, height = get_top_panel_geometry(
    panel_height, geometry)

  # geometry: -g widthxheight+x+y
  geom_res = "#{width}x#{height}+#{xpos}+#{ypos}"

  # color, with transparency
  bgcolor = "'#aa000000'"
  fgcolor = "'#ffffff'"

  # XFT: require lemonbar_xft_git
  font_takaop  = "takaopgothic-9"
  font_bottom  = "monospace-9"
  font_symbol  = "PowerlineSymbols-11"
  font_awesome = "FontAwesome-9"

  parameters  = "  -g #{geom_res} -u 2" \
                   " -B #{bgcolor} -F #{fgcolor}" \
                   " -f #{font_takaop} -f #{font_awesome} -f #{font_symbol}"
end
3: Testing The Parameters
Consider this code 01-testparams.rb.
The script call the above function to get lemon parameters.
#!/usr/bin/ruby
require_relative 'helper'

# initialize
panel_height = 24
monitor = get_monitor(ARGV)

lemon_parameters = get_lemon_parameters(monitor, panel_height)
puts(lemon_parameters)
This will produce output something similar to this result
-g 1280x24+0+0 -u 2 -B '#aa000000' -F '#ffffff'
-f takaopgothic-9 -f FontAwesome-9 -f PowerlineSymbols-11
Or in Dzen2 version:
-x 0 -y 0 -w 1280 -h 24 -ta l
-bg '#000000' -fg '#ffffff' -title-name dzentop
-fn '-*-takaopgothic-medium-*-*-*-12-*-*-*-*-*-*-*'
View Source File:
4: Adjusting the Desktop
Since we want to use panel, we have to adjust the desktop gap, giving space at the top and bottom.
$ herbstclient pad 0 24 0 24 0For more information, do $ man herbsluftclient,
and type \pad to search what it means.
In script, it looks like this below.
system("herbstclient pad #{monitor} #{panel_height} 0 #{panel_height} 0")5: Color Schemes
Using a simple data structure key-value pairs, we have access to google material color for use with dzen2 or lemonbar. Having a nice pallete to work with, makes our panel more fun.
gmc.rb
module GMC
  Color = {
    'white' => '#ffffff',
    'black' => '#000000',

    'grey50'  => '#fafafa',
    'grey100' => '#f5f5f5',
  }
end
View Source File:
-
Lemonbar: gitlab.com/…/dotfiles/…/ruby/gmc.rb
6: Preparing Output
Let’s have a look at output.rb in github.
View Source File:
7: Global Variable and Constant
Constant in Ruby start with capital case.
The @ before the variable means it is an instance variable.
Mutable State: Segment Variable
The different between interval based and event based is that, with interval based all panel segment are recalculated, while with event based only recalculate the trigerred segment.
In this case, we only have two segment in panel.
-
Tag
-
Title
output.py
In script, we initialize the variable as below
segment_windowtitle = '' # empty string
tags_status = []         # empty array
Each segment buffered. And will be called while rendering the panel.
Global Constant: Tag Name
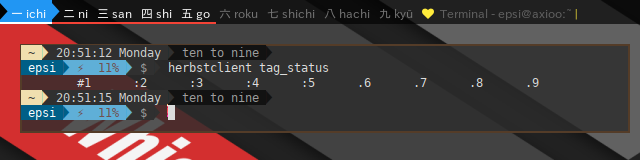
Assuming that herbstclient tag status only consist of nine number element.
$ herbstclient tag_status
	#1	:2	:3	:4	:5	.6	.7	.8	.9
We can manage custom tag names, consist of nine string element. We can also freely using unicode string instead of plain one.
output.py
@TAG_SHOWS = ['一 ichi', '二 ni', '三 san', '四 shi',
  '五 go', '六 roku', '七 shichi', '八 hachi', '九 kyū', '十 jū']
Global Constant: Decoration
output.py
Decoration consist lemonbar formatting tag.
require_relative 'gmc'
include GMC
# decoration
@SEPARATOR = "%{B-}%{F#{COLOR['yellow500']}}|%{B-}%{F-}"
# Powerline Symbol
@RIGHT_HARD_ARROW = ""
@RIGHT_SOFT_ARROW = ""
@LEFT_HARD_ARROW = ""
@LEFT_SOFT_ARROW = ""
# theme
@PRE_ICON = "%{F#{COLOR['yellow500']}}"
@POST_ICON = "%{F-}"8: Segment Variable
As response to herbstclient event idle, these two function set the state of segment variable.
output.py
def set_tag_value(monitor)
  raw = IO.popen('herbstclient tag_status ' + monitor.to_s).read()
  @tags_status = raw.strip.split("\t")
end
This function above turn the tag status string into array of tags for later use.
output.py
def set_windowtitle(windowtitle)
icon = @PRE_ICON + '' + @POST_ICON
@segment_windowtitle = " #{icon} %{B-}" \
+ "%{F#{COLOR['grey700']}} #{windowtitle}"
endWe will call these two functions later.
9: Decorating: Window Title
This is self explanatory. I put separator, just in case you want to add other segment. And then returning string as result.
output.py
def output_by_title()
  text = "#{@segment_windowtitle} #{@SEPARATOR}  ";
end
10: Decorating: Tag Status
This transform each plain tag such as .2,
to decorated tag names such as 二 ni.
Note that it only process one tag.
We process all tags in a loop in other function.
This has some parts:
-
Pre Text: Color setting for Main Text (Background, Foreground, Underline). Arrow before the text, only for active tag.
-
Main Text: Tag Name by number, each with their tag state
#,+,.,|,!, and each tag has clickable area setting. -
Post Text: Arrow after the text, only for active tag.
-
Color Reset:
%{B-},%{F-},%{-u}(Background, Foreground, Underline).
output.py
def output_by_tag(monitor, tag_status)
  tag_index  = tag_status[1..1]
  tag_mark   = tag_status[0..0]
  tag_name   = @TAG_SHOWS[tag_index.to_i - 1] # zero based

  # ----- pre tag

  case tag_mark
  when '#'
    text_pre = "%{B#{COLOR['blue500']}}%{F#{COLOR['black']}}" \
             + "%{U#{COLOR['white']}}%{+u}#{@RIGHT_HARD_ARROW}" \
             + "%{B#{COLOR['blue500']}}%{F#{COLOR['white']}}" \
             + "%{U#{COLOR['white']}}%{+u}"
  when '+'
    text_pre = "%{B#{COLOR['yellow500']}}%{F#{COLOR['grey400']}}"
  when ':'
    text_pre = "%{B-}%{F#{COLOR['white']}}" \
             + "%{U#{COLOR['red500']}}%{+u}"
  when '!'
    text_pre = "%{B#{COLOR['red500']}}%{F#{COLOR['white']}}" \
             + "%{U#{COLOR['white']}}%{+u}"
  else
    text_pre = "%{B-}%{F#{COLOR['grey600']}}%{-u}"
  end

  # ----- tag by number

  # clickable tags
  text_name = "%{A:herbstclient focus_monitor \"#{monitor}\" && " \
            + "herbstclient use \"#{tag_index}\":} #{tag_name} %{A} "

  # non clickable tags
  # text_name = " #{tag_name} "

  # ----- post tag

  if tag_mark == '#'
    text_post = "%{B-}%{F#{COLOR['blue500']}}" \
              + "%{U#{COLOR['red500']}}%{+u}" \
              + @RIGHT_HARD_ARROW;
  else
    text_post = ""
  end

  text_clear = '%{B-}%{F-}%{-u}'

  text_pre + text_name + text_post + text_clear
end
11: Combine The Segments
Now it is time to combine all segments to compose one panel.
Lemonbar is using %{l} to align left segment,
and %{r} to align right segment.
All tags processed in a loop.
output.py
def get_statusbar_text(monitor)
  text = ''

  # draw tags
  #text << '%{l}'
  @tags_status.each { |tag_status|
    text << output_by_tag(monitor, tag_status) }

  # draw window title
  text << '%{r}'
  text << output_by_title()
end
12: Testing The Output
Consider this code 02-testoutput.rb.
The script using pipe as feed to lemonbar.
We append -p parameter to make the panel persistent.
#!/usr/bin/ruby
require_relative 'helper'

# process handler
def test_lemon(monitor, parameters)
  require_relative 'output'

  command_out  = 'lemonbar ' + parameters + ' -p'
  IO.popen(command_out, 'w') do |f|
    # initialize statusbar
    set_tag_value(monitor)
    set_windowtitle('test')

    text = get_statusbar_text(monitor)
    f.puts(text)

    f.close()
  end
end

# initialize
panel_height = 24
monitor = get_monitor(ARGV)
lemon_parameters = get_lemon_parameters(monitor, panel_height)

# test
system("herbstclient pad #{monitor} #{panel_height} 0 #{panel_height} 0")
test_lemon(monitor, lemon_parameters)
This will produce a panel on top.
The panel only contain the initialized version of the text. It does not really interact with the HerbstluftWM event.
You can also click the clickable area to see it’s result. It only show text, not executed yet.
herbstclient focus_monitor "0" && herbstclient use "2"
herbstclient focus_monitor "0" && herbstclient use "3"
View Source File:
Coming up Next
It is already a long tutorial. It is time to take a break for a while.
We are going to continue on next tutorial to cover interaction between the script process and HerbstluftWM idle event.
Enjoy the statusbar !