Preface
Goal: Show the Herbstclient Tag.
Focusing in "herbstclient tag_status".
This tutorial cover Lemonbar, and in order to use Dzen2, any reader could use the source code in github.
Table of Content
-
Preface: Table of Content
-
2: Get Geometry
Reference
Reading
Before you jump off to scripting, you might desire to read this overview.
All The Source Code
Impatient coder like me, like to open many tab on browser.
-
Lemonbar: gitlab.com/…/dotfiles/…/haskell/
Screenshot
Since window manager is out of topic in this tutorial, I present only panel HerbstluftWM screenshot.
Dzen2

Lemonbar

1: Directory Structure
Directory Structure has been explained in preface.
For both Dzen2 and Lemonbar, the structure are the same.
This figure will explain how it looks
in Haskell script directory.
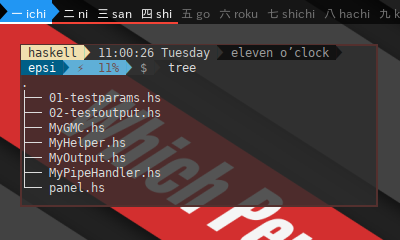
Special customization can be done in output script, without changing the whole stuff.
2: Get Geometry
Let’s have a look at helper.hs in github.
View Source File:
Get Script Argument
The original herbstluftwm panel example, contain statusbar for each monitor. The default is using monitor 0, although you can use other monitor as well.
$ ./panel.hs 0I do not implement statusbar in multi monitor since I only have my notebook. But I’ll pass the argument anyway for learning purpose.
Here it is our code in Haskell.
helper.hs
Using guards as an alternate to ternary operator.
module MyHelper (getMonitor) where

getMonitor :: [String] -> Int
getMonitor args
  | length(args) > 0 = read (args !! 0) :: Int
  | otherwise        = 0
In order to use getArgs,
we need to import System.Environment module
import System.Environment
import MyHelper
Now in main code we can call
main = do
    args <- getArgs
    let monitor = getMonitor args
    putStrLn $ show monitor
This will display 0 or else such as 1,
depend on the script argument given.
0Get Monitor Geometry
HerbstluftWM give this little tools to manage monitor geometry by getting monitor rectangle.
$ herbstclient monitor_rectThis will show something similar to this.
0 0 1280 800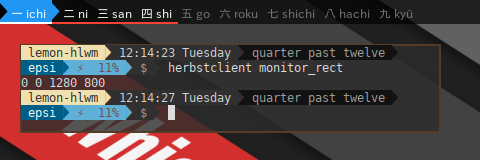
Consider wrap the code into function. And get an array as function return. This function need a few standard library.
-
In order to use
createProcess, we need to importSystem.Processmodule. -
In order to use
hGetContents, we also need to importSystem.IOmodule. -
In order to use
exitSuccess, we also need to importSystem.Exitmodule. -
In order to use
when, we also need to importControl.Monadmodule.
helper.hs
module MyHelper
( getMonitor
, getGeometry
) where

import System.Process
import System.IO
import System.Exit

import Control.Monad

getGeometry :: Int -> IO [Int]
getGeometry monitor = do
    let args = ["monitor_rect", show(monitor)]

    (_, Just pipe_out, _, ph) <-
        createProcess (proc "herbstclient" args)
        { std_out = CreatePipe }

    raw <- hGetContents pipe_out
    _ <- waitForProcess ph

    when (raw == "") $ do
        putStrLn $ "Invalid monitor " ++ show(monitor)
        exitSuccess

    let geometry = map (read::String->Int) (words raw)

    return geometry
Consider call this function from script later.
The show enable Integer to String conversion.
To print array in Haskell, we just have to wrap it in
intercalate " " $ map show geometry.
In order to use intercalate,
we need to import Data.List module.
import System.Environment
import Data.List
import MyHelper

main = do
    args <- getArgs
    let monitor = getMonitor args

    geometry <- getGeometry monitor
    putStrLn $ show geometry
    putStrLn $ intercalate " " $ map show geometry
This will produce
0 0 1280 800Get Panel Geometry
The Panel geometry is completely depend on the user flavor and taste. You can put it, on top, or bottom, or hanging somewhere. You can create gap on both left and right.
Consider this example:
helper.hs
We import XYWH constructor
in data XYWH using
module MyHelper (XYWH (XYWH)) where
module MyHelper
( getMonitor
, getGeometry
, XYWH (XYWH)
, getTopPanelGeometry
, getBottomPanelGeometry
) where

data XYWH = XYWH String String String String

getBottomPanelGeometry :: Int -> [Int] -> XYWH
getBottomPanelGeometry
    height geometry = XYWH
                      (show ((geometry !! 0) + 24))
                      (show ((geometry !! 3) - height))
                      (show ((geometry !! 2) - 48))
                      (show height)
We are going to use this X Y W H,
to get lemonbar parameter.
import System.Environment
import MyHelper

panelHeight = 24

main = do
    args <- getArgs
    let monitor = getMonitor args

    geometry <- getGeometry monitor
    let XYWH xpos ypos width height = getBottomPanelGeometry
                                      panelHeight geometry

    putStrLn $ "Lemonbar geometry: " ++ width ++ "x" ++ height
            ++ "+" ++ xpos ++ "+" ++ ypos
This will show something similar to this result, depend on your monitor size.
Lemonbar geometry: 1280x24+24+776Get Lemonbar Parameters
We almost done. This is the last step. We wrap it all inside this function below.
helper.hs
getLemonParameters :: Int -> [Int] -> [String]
getLemonParameters
    panelHeight geometry = [
          "-g", geom_res,  "-u", "2",
          "-B", bgcolor, "-F", fgcolor,
          "-f", font_takaop,
          "-f", font_awesome,
          "-f", font_symbol
        ]
      where
        -- calculate geometry
        XYWH xpos ypos width height = getBottomPanelGeometry
                                      panelHeight geometry

        -- geometry: -g widthxheight++y
        geom_res = width ++ "x" ++ height
            ++ "+" ++ xpos ++ "+" ++ ypos

        -- color, with transparency
        bgcolor = "#aa000000"
        fgcolor = "#ffffff"

        -- XFT: require lemonbar_xft_git
        font_takaop  = "takaopgothic-9"
        font_bottom  = "monospace-9"
        font_symbol  = "PowerlineSymbols-11"
        font_awesome = "FontAwesome-9"
3: Testing The Parameters
Consider this code 01-testparams.hs.
The script call the above function to get lemon parameters.
import System.Environment
import Data.List
import MyHelper

panelHeight = 24

main = do
    args <- getArgs
    let monitor = getMonitor args

    geometry <- getGeometry monitor
    let lemonParameters = getLemonParameters panelHeight geometry

    putStrLn $ intercalate " " $ lemonParameters
This will produce output something similar to this result
-g 1232x24+24+776 -u 2 -B #aa000000 -F #ffffff
-f takaopgothic-9 -f FontAwesome-9 -f PowerlineSymbols-11
Or in Dzen2 version:
-x 0 -y 0 -w 1280 -h 24 -ta l
-bg #000000 -fg #ffffff -title-name dzentop
-fn -*-takaopgothic-medium-*-*-*-12-*-*-*-*-*-*-*
View Source File:
4: Adjusting the Desktop
Since we want to use panel, we have to adjust the desktop gap, giving space at the top and bottom.
$ herbstclient pad 0 24 0 24 0For more information, do $ man herbsluftclient,
and type \pad to search what it means.
In script, it looks like this below.
main = do
    system $ "herbstclient pad " ++ show(monitor) ++ " "
        ++ show(panelHeight) ++ " 0 " ++ show(panelHeight) ++ " 0"
5: Color Schemes
Using a simple data structure key-value pairs, we have access to google material color for use with dzen2 or lemonbar. Having a nice pallete to work with, makes our panel more fun.
gmc.hs
colorSchemes :: [(String, String)]
colorSchemes =
    [("white",     "#ffffff")
    ,("black",     "#000000")

    ,("grey50",     "#fafafa")
    ,("grey100",    "#f5f5f5")
    ]

myColor :: String -> String
myColor key = M.findWithDefault "#ffffff" key (fromList colorSchemes)
View Source File:
6: Preparing Output
Let’s have a look at output.hs in github.
View Source File:
7: Global Variable and Constant
Haskell designed not to have a global variable.
Simulate Mutable State
Officialy there is a no way to define global variable Haskell.
But Haskell provide a few workaround to simulate mutable state.
The easiest one is using unsafePerformIO,
and currently that also the only method I understand.
Haskell distinct clearly between global constant (immutable) and global variable (mutable). While with immutable global constant we can make function easily, with mutable global variable, action is unavoidable.
The issue with using unsafePerformIO is,
“it is an IO action”.
Therefore we need Functor <$> operator
to make the action works with function.
By using global variable, IO action is unavoidable
Mutable State: Segment Variable
The different between interval based and event based is that, with interval based all panel segment are recalculated, while with event based only recalculate the trigerred segment.
In this case, we only have two segment in panel.
-
Tag
-
Title
output.hs
In script, we initialize the variable as below
segmentWindowtitle :: IORef String
segmentWindowtitle = unsafePerformIO $ newIORef "" -- empty string

tagsStatus :: IORef [String]
tagsStatus = unsafePerformIO $ newIORef []         -- empty string
Each segment buffered. And will be called while rendering the panel.
Global Constant: Tag Name
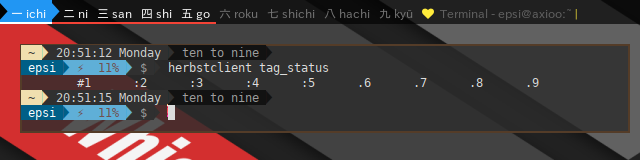
Assuming that herbstclient tag status only consist of nine number element.
$ herbstclient tag_status
	#1	:2	:3	:4	:5	.6	.7	.8	.9
We can manage custom tag names, consist of nine string element. We can also freely using unicode string instead of plain one.
output.hs
tagShows :: [String]
tagShows = ["一 ichi", "二 ni", "三 san", "四 shi",
    "五 go", "六 roku", "七 shichi", "八 hachi", "九 kyū", "十 jū"]
Global Constant: Decoration
output.hs
Decoration consist lemonbar formatting tag.
import MyGMC

-- decoration
separator = "%{B-}%{F" ++ myColor "yellow500" ++ "}|%{B-}%{F-}"

-- Powerline Symbol
rightHardArrow = "\57520"
rightSoftArrow = "\57521"
leftHardArrow  = "\57522"
leftSoftArrow  = "\57523"

-- theme
preIcon    = "%{F" ++ myColor "yellow500" ++ "}"
postIcon   = "%{F-}"
8: Segment Variable
As response to herbstclient event idle, these two function set the state of segment variable.
output.hs
This is an IO action.
setTagValue :: Int -> IO ()
setTagValue monitor = do
    let args = ["tag_status", show(monitor)]

    (_, Just pipe_out, _, ph) <-
        createProcess (proc "herbstclient" args)
        { std_out = CreatePipe }

    raw <- hGetContents pipe_out
    _ <- waitForProcess ph

    let statusList = words raw
    writeIORef tagsStatus statusList
This function above turn the tag status string into array of tags for later use.
output.hs
This is also an IO action.
setWindowtitle :: String -> IO ()
setWindowtitle windowtitle = do
    let icon = preIcon ++ "\61444" ++ postIcon
    let text = " " ++ icon ++ " %{B-}"
               ++ "%{F" ++ myColor "grey700" ++ "} " ++ windowtitle
    writeIORef segmentWindowtitle text
We will call these two functions later.
9: Decorating: Window Title
This is self explanatory. I put separator, just in case you want to add other segment. And then returning string as result.
output.hs
This is an IO action.
outputByTitle :: IO String
outputByTitle = do
    segment <- readIORef segmentWindowtitle
    let text  = segment ++ " " ++ separator ++ "  "

    return text
10: Decorating: Tag Status
This transform each plain tag such as .2,
to decorated tag names such as 二 ni.
Note that it only process one tag.
We process all tags in a loop in other function.
This has some parts:
-
Pre Text: Color setting for Main Text (Background, Foreground, Underline). Arrow before the text, only for active tag.
-
Main Text: Tag Name by number, each with their tag state
#,+,.,|,!, and each tag has clickable area setting. -
Post Text: Arrow after the text, only for active tag.
-
Color Reset:
%{B-},%{F-},%{-u}(Background, Foreground, Underline).
output.hs
This is an function. Although it looks long,
there is no sequence of command within this function,
outputByTag :: Int -> String -> String
outputByTag monitor tagStatus =
    textPre ++ textName ++ textPost ++ textClear
  where
    -- text = ''

    tagIndex  = drop 1 tagStatus
    tagMark   = take 1 tagStatus
    index     = (read::String->Int) tagIndex - 1     -- zero based
    tagName   = tagShows !! index

    ----- pre tag

    textPre   = case tagMark of
        "#" -> "%{B" ++ myColor "blue500" ++ "}"
            ++ "%{F" ++ myColor "black" ++ "}"
            ++ "%{U" ++ myColor "white" ++ "}%{+u}"
            ++ rightHardArrow
            ++ "%{B" ++ myColor "blue500" ++ "}"
            ++ "%{F" ++ myColor "white" ++ "}"
            ++ "%{U" ++ myColor "white" ++ "}%{+u}"
        "+" -> "%{B" ++ myColor "yellow500" ++ "}"
            ++ "%{F" ++ myColor "grey400" ++ "}"
        ":" -> "%{B-}"
            ++"%{F" ++ myColor "white" ++ "}"
            ++ "%{U" ++ myColor "red500" ++ "}%{+u}"
        "!" -> "%{B" ++ myColor "red500" ++ "}"
            ++ "%{F" ++ myColor "white" ++ "}"
            ++ "%{U" ++ myColor "white" ++ "}%{+u}"
        _   -> "%{B-}"
            ++ "%{F" ++ myColor "grey600" ++ "}%{-u}"

    ----- tag by number

    -- clickable tags
    textName  = "%{A:herbstclient focus_monitor \""
        ++ show(monitor) ++ "\" && " ++ "herbstclient use \""
        ++ tagIndex ++ "\":} " ++ tagName ++ " %{A} "

    -- non clickable tags
    -- textName = " " ++ tagName ++ " "

    ----- post tag

    textPost  = if (tagMark == "#")
                    then "%{B-}"
                      ++ "%{F" ++ myColor "blue500" ++ "}"
                      ++ "%{U" ++ myColor "red500" ++ "}%{+u}"
                      ++ rightHardArrow
                    else ""

    textClear = "%{B-}%{F-}%{-u}"
11: Combine The Segments
Now it is time to combine all segments to compose one panel.
Lemonbar is using %{l} to align left segment,
and %{r} to align right segment.
All tags processed in a loop.
output.hs
This is an IO action. Note that <$> operator.
getStatusbarText :: Int -> IO String
getStatusbarText monitor = do
    tags <- readIORef tagsStatus
    let tagText =  "%{l}" ++ (join $ map (outputByTag monitor) tags)
    let titleText = ("%{r}" ++) <$> outputByTitle
    let text = (tagText ++) <$> titleText
    text
12: Testing The Output
Consider this code 02-testoutput.hs.
The script using pipe as feed to lemonbar.
We append -p parameter to make the panel persistent.
import System.Environment
import System.Process
import System.IO
import GHC.IO.Handle

import MyHelper
import MyOutput

-- initialize
panelHeight = 24

-- process handler
testLemon :: Int -> [String] -> IO ()
testLemon monitor parameters = do
    let command_out = "lemonbar"

    (Just pipe_in, _, _, ph)  <-
        createProcess (proc command_out (parameters ++ ["-p"]) )
        { std_in = CreatePipe }

    -- initialize statusbar before loop
    setTagValue monitor
    setWindowtitle "test"

    text <- getStatusbarText monitor

    hPutStrLn pipe_in text
    hFlush pipe_in

    hClose pipe_in

main = do
    args <- getArgs
    let monitor = getMonitor args

    geometry <- getGeometry monitor
    let lemonParameters = getLemonParameters panelHeight geometry

    -- test
    system $ "herbstclient pad " ++ show(monitor) ++ " "
        ++ show(panelHeight) ++ " 0 " ++ show(panelHeight) ++ " 0"

    testLemon monitor lemonParameters

    -- end of IO
    return ()
This will produce a panel on top.
The panel only contain the initialized version of the text. It does not really interact with the HerbstluftWM event.
You can also click the clickable area to see it’s result. It only show text, not executed yet.
herbstclient focus_monitor "0" && herbstclient use "2"
herbstclient focus_monitor "0" && herbstclient use "3"
View Source File:
Coming up Next
It is already a long tutorial. It is time to take a break for a while.
We are going to continue on next tutorial to cover interaction between the script process and HerbstluftWM idle event.
Enjoy the statusbar !