Preface
Good day folks,
It has been a busy busy year that forced me to be apart from my blog. But here we are again, jump from Linux to BSD.
Table of Content
-
Preface: Table of Content
-
1: A Well Oops
1: A Well Oops
One day, I try to cheer my self up, by buying a second handed notebook. After ten days, setting up W7, Proxmox, Void, Funtoo, and NixOS. The notebook was ready to be use as my daily basis working station. Well you know, I have to face a busy busy month ahead of me. Before I sleep, I decide to install my last OS, the latest True OS, and I accidentally wipe all partition in that notebook. Oo wwhat a mess…?@#!!!
After a while, I feel a warm bright light in my mind, and give me this idea: This is it!! It is time to give BSD family a try. After find time, started at weekend, I try some distribution.
Kill the boy, and let the man be born
One Week Journey
My personal historical journey
-
The True OS server. The very moment that wipe all the notebook partition.
-
The old True OS desktop. Realize It doesn’t detect my display river and wireless card. I give up and search for something easier.
-
GhostBSD with UFS, multiboot with W7 64bit. Trying to setup wireless dongle because my internal card is not supported. I also try many kind of desktop environment.
-
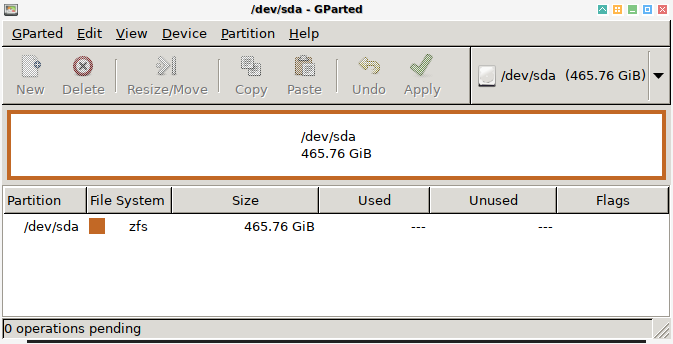
Trident with ZFS, I choose to use all hard drive space. And realize this volume manager is something cool. I also experience Lumina.
-
TrueOS again, TrueOS again with ZFS. Realize it comes with no destktop, I finally get into xorg, after succeed in detecting my i915 display driver.
-
Finally settle with multiboot of W7, GhostBSD and some linux. What has been an accident, leverage my knowledge. A blessed in disguise.
I found that installing and using GhostBSD is as easy as Ubuntu or Manjaro.
Why GhostBSD
Multiboot mean a chance to learn other OS.
After testing TrueOS, Trident and GhostBSD, I finally decide to choose GhostBSD. Between these three, GhostBSD is the only distribution, that allow me to install BSD as multiboot. Multiboot mean a chance to learn other OS. I do not want VM, I desire native.
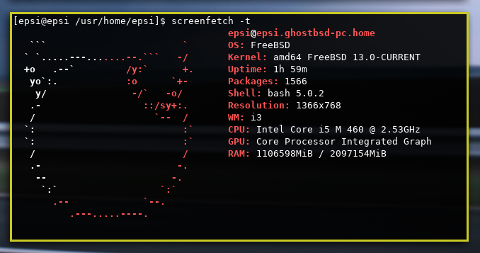
Screenshot
My first impression of the logo is that it looks like hello kitty.
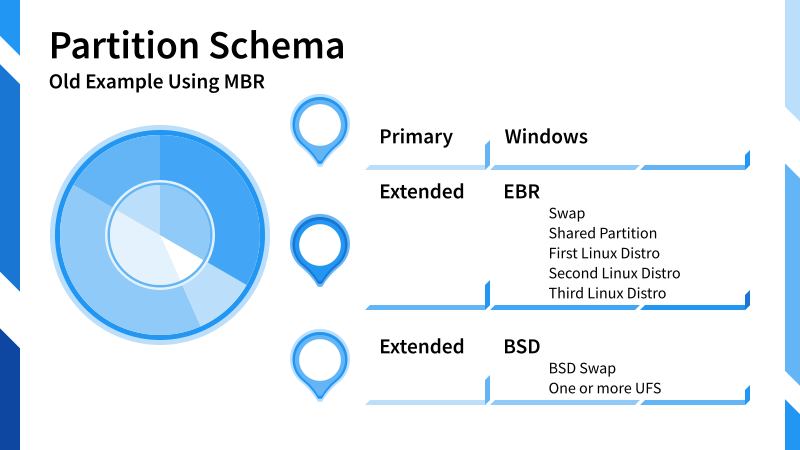
2: How I did the Multiboot
Do not mix this freebsd extended partition with any linux partition.
For MBR situation, it takes:
-
One Primary Partition for Windows. Or two if you have windows system restore.
-
Free Space for GhostBSD. Or Primary Partition to be converted later.
-
Free Space for Extended Partiions. This could be used as container for some linux, swap, data partition, or maybe windows data.
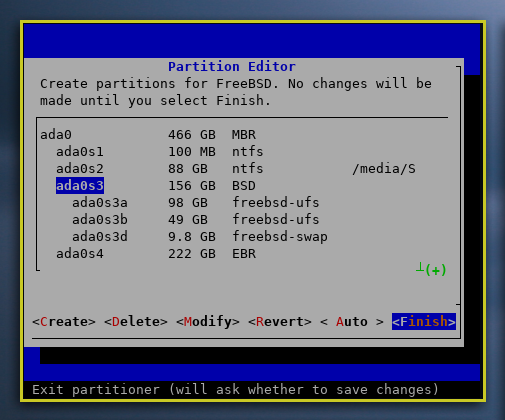
Partitions Arrangement
Consider this screenshot, so you can figure out what I’m talking about.
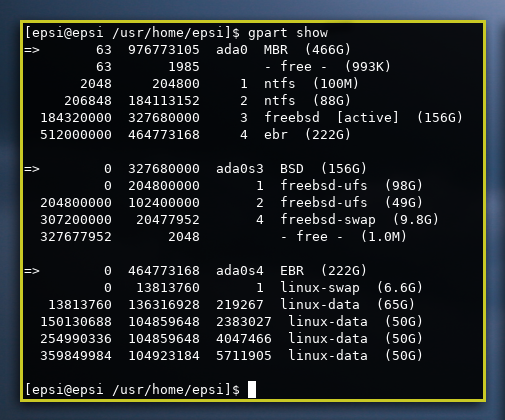
Note that I took this picture after installing GhostBSD.
Burning The Live ISO
It is easier to use USB these day than burning into DVD.
Just be sure that you choose the right device.
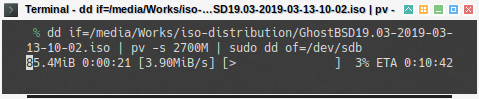
$ sudo dd if=/media/Works/iso-distribution/GhostBSD18.12.iso of=/dev/sdb bs=4096Or even better using pv.
$ dd if=/media/Works/iso-distribution/GhostBSD18.12.iso | pv -s 2700M | sudo dd of=/dev/sdbWindows
This should be installed first. I only use W7. There are places that you can get the ISO for free. And for serial number that legal, I use the serial from the back of my second handed notebook.
Since my second handed DVD is broken. I must use USB installer.
It turn out that dd doesn’t work for this windows ISO.
But finally I can get it works by using woeusb (winusb).
I only use 80 GB of for this NTFS partition.
GhostBSD
While in GUI installation, Pick UFS Custom Partittioning.
-
Create FreeBSD Extended: about 160 GB.
-
Create inside it: root, home, swap.
Before installing GhostBSD, make sure that it has free space.
Do not create extended partition using Windows,
as it will give partition with erb type that won’t match to use with UFS.
UFS need the partition type to be freebsd.
You can use cfdisk for any linux live to setup this partition.
but I rather use GhostBSD installer.
Or even better, UFS Custom Partitioning will do it for you.
FreeBSD booloader will detect W7. No need to worry.
Linux
I use Void, and it installed well.
The issue is GRUB won’t detect FreeBSD.
So we have to customize 40-grub-custom manually.
$ sudo cat /etc/grub.d/40_custom
#!/bin/sh
exec tail -n +3 $0

menuentry "GhostBSD" {
    insmod ufs2
    insmod bsd
    set root='hd0,msdos3'
    kfreebsd /boot/loader
}
Reboot… and Voila… it all works.
Other partition
I setup 60GB data partition dedicated to be shared between linux and BSD.
I also setup other linux as well, Funtoo, and one partition that likely change from time to time.
Partition Editor
FreeBSD came with no gparted. You can use sade instead.
3: Disk Management
Well, this is basically just my install log.
fstab
By the time I finished the fresh install,
the fstab looks like this:
# Device    Mountpoint    FStype    Options  Dump Pass
/dev/label/rootfs0      /           ufs         rw,noatime  1  1
/dev/label/usrhome0     /usr/home   ufs         rw,noatime  1  1
/dev/label/swap0        none        swap        sw  0  0
procfs      /proc       procfs      rw          00
linprocfs   /compat/linux/proc      linprocfs   rw    00
tmpfs       /compat/linux/dev/shm   tmpfs       rw,mode=1777 0 0
Mount using CLI
There is a few differences mounting in FreeBSD.
$ sudo ntfs-3g /dev/ada0s2 /media/System$ sudo ext4fuse /dev/ada0s6 /media/Works/$ sudo mount_msdosfs /dev/da1s1 /media/Flash/Mount using fstab
And as always, fstab.
/dev/ada0s2     /media/System   ntfs   mountprog=/usr/local/bin/ntfs-3g,allow_other,late,rw          0       0
/dev/ada0s6     /media/Works    ext4   mountprog=/usr/local/bin/ext4fuse,allow_other,late,rw         0       0
Unlike linux, I should always use sudo, until I find a way.
What is Next 🤔?
Thank you for reading this article.
Consider continue reading [ GhostBSD - Driver ].